My website now has the capability to host the blog. As such, I have imported all the posts currently on this blog and will be posting future blog posts there instead of here.
To access the blog, please go to: http://www.eprisephoto.com/blog
If you are here searching for "Annie's Astro Actions", they can be found and ordered at the website, as well. This link is: http://www.eprisephoto.com/astro-actions
If you have any questions or comments, you may contact me at: antimorris@me.com
Thank you for visiting!
Monday, January 27, 2014


Friday, December 6, 2013
Step by Step processing of the Orion Nebula
I have gotten several requests as to how I processed my latest M42. Before I go into that I want to mention that my processing of this was done using Adobe Photoshop CS5 and includes a few different processes layered together. This is snowballed a little by M42 and its high dynamic range from the core to the outer dust, which adds layering to avoid blowing out the core.
I will include photos as I go so you can see how the steps progress. I started with several stacks as I took multiple exposure lengths. I took 5 different sets and ended up making 2 master stacks: one for the core with the 60s and 120s exposures, one with the 480s, 600s, and the 900s exposures for the rest. I would normally use each set as its own process and layer the 5 together but started with the two to try to save time and it turned out well so didn't go back and do the individual stack processes.
Here are the two master stacks:
 I started with a process of the core stack. I didn't focus on stretching it too much as I was just going for the detail in the core as the other stack would cover all the rest of the detail. A few levels, curves, and the enhance dust lanes action from my set and here is the final core stretch:
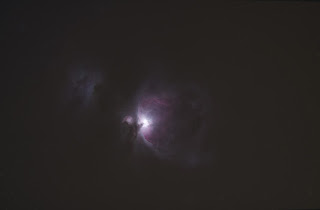 I saved this and then pulled up the long exposure stack and for the first run-through on it I removed the stars (action in the set) and some additional fine tuning using the clone tool for the brighter stars resulting in a starless main stack. I also ran GradientXTerminator for the image as I had a little bit of gradient showing from shooting in the south where there is a town about 15 miles away:
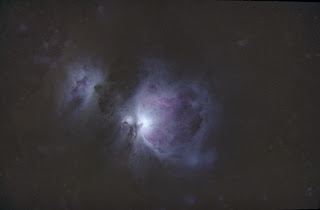 From here I ran the Channel Process action followed by a couple small manual rounds of curves, as well as the dust & scratches filter to take care of a few of the star remnants that pop up when you stretch which left me here:
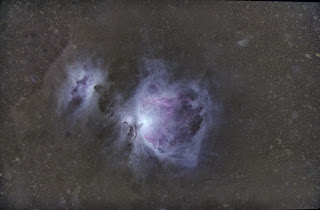 I opened up the Color Efex Pro plugin and used the Detail Extractor as well as the Color Contrast Range selections which brought out a good bit of the dust. I did a little additional touchup with Dust & Scratches and the clone tool for the star remnants again (especially for the two larger stars just at the bottom on M42):
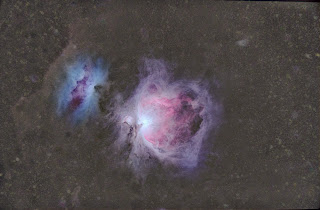 The colors were beginning to get a bit muted so I did some selective color boosting to bring out the reds that had gotten dulled down when I balanced the background with GradientXTerminator:
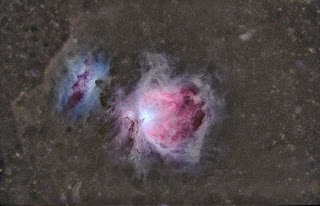 I ran my Enhance Dust lanes action and then pulled the image back into Color Efex Pro and did a mild Detail Extractor along with Tonal Contast and Pro Contrast:
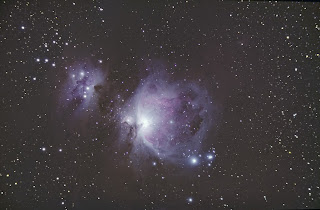 Now I opened the original stack and began processing with the Channel Process action and the GradientXTerminator plugin (basically started the processing the same way I did with the starless version):
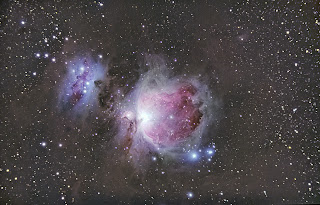 I ran Enhance Dust Lanes and some selective color boosting via Match Color (Image>Adjustments). To do this I used the lasso tool, feathered, on the two nebulas individually so I could customize each one a little better. After this I ran the Reduce Star Size action followed by Boost Star Colors. I then did a small amount of curves:
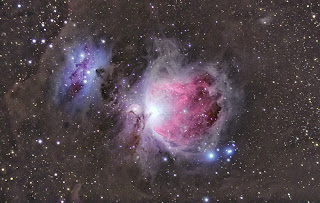 Now I brought the starless processing up and made it a layer on top of the starred semi-process and set the blending mode to lighten to bring through the stretched dust of the starless version and the stretched stars of the lower layer. I pulled up the lens correction filter and used it to counter some of the coma I had from forgetting to use my field flattener. I cropped as well just a small bit to focus the attention more on the nebula and the immediate surrounding dust:
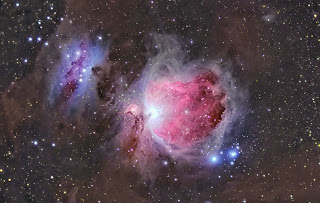 I did a little more color boosting with Match Color and the Brighten Color & Sharpen action and used some layered contrasting on the dust. This helped to make the browns in the dust pop compared to the background and the colors and details in the nebula to show up a bit better:
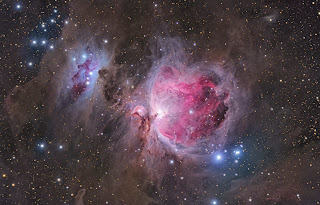 Now I opened up the core processing and layered it into the core section of M42 (using this method) to show the detail of the core in the parts that got blown out in the longer exposure stretching. I toned down the blue a little around M43 as well since the previous color boost had made it a bit more of a focus than M42. Finally I ran the star color boosting action and ran Noise Ninja on the image to produce the final image:

I will include photos as I go so you can see how the steps progress. I started with several stacks as I took multiple exposure lengths. I took 5 different sets and ended up making 2 master stacks: one for the core with the 60s and 120s exposures, one with the 480s, 600s, and the 900s exposures for the rest. I would normally use each set as its own process and layer the 5 together but started with the two to try to save time and it turned out well so didn't go back and do the individual stack processes.
Here are the two master stacks:
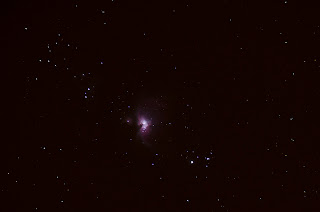 |
| Core Stack |
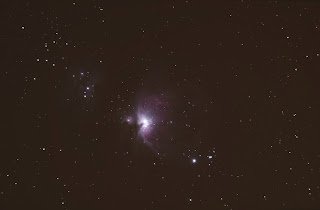 |
| Long Exposure Stack |
I saved this and then pulled up the long exposure stack and for the first run-through on it I removed the stars (action in the set) and some additional fine tuning using the clone tool for the brighter stars resulting in a starless main stack. I also ran GradientXTerminator for the image as I had a little bit of gradient showing from shooting in the south where there is a town about 15 miles away:From here I ran the Channel Process action followed by a couple small manual rounds of curves, as well as the dust & scratches filter to take care of a few of the star remnants that pop up when you stretch which left me here:I opened up the Color Efex Pro plugin and used the Detail Extractor as well as the Color Contrast Range selections which brought out a good bit of the dust. I did a little additional touchup with Dust & Scratches and the clone tool for the star remnants again (especially for the two larger stars just at the bottom on M42): The colors were beginning to get a bit muted so I did some selective color boosting to bring out the reds that had gotten dulled down when I balanced the background with GradientXTerminator:I ran my Enhance Dust lanes action and then pulled the image back into Color Efex Pro and did a mild Detail Extractor along with Tonal Contast and Pro Contrast: Now I opened the original stack and began processing with the Channel Process action and the GradientXTerminator plugin (basically started the processing the same way I did with the starless version):I ran Enhance Dust Lanes and some selective color boosting via Match Color (Image>Adjustments). To do this I used the lasso tool, feathered, on the two nebulas individually so I could customize each one a little better. After this I ran the Reduce Star Size action followed by Boost Star Colors. I then did a small amount of curves:Now I brought the starless processing up and made it a layer on top of the starred semi-process and set the blending mode to lighten to bring through the stretched dust of the starless version and the stretched stars of the lower layer. I pulled up the lens correction filter and used it to counter some of the coma I had from forgetting to use my field flattener. I cropped as well just a small bit to focus the attention more on the nebula and the immediate surrounding dust: I did a little more color boosting with Match Color and the Brighten Color & Sharpen action and used some layered contrasting on the dust. This helped to make the browns in the dust pop compared to the background and the colors and details in the nebula to show up a bit better:Now I opened up the core processing and layered it into the core section of M42 (using this method) to show the detail of the core in the parts that got blown out in the longer exposure stretching. I toned down the blue a little around M43 as well since the previous color boost had made it a bit more of a focus than M42. Finally I ran the star color boosting action and ran Noise Ninja on the image to produce the final image:
Here is a larger version of the final image:
Thursday, December 5, 2013
Bringing out the dust
I finally got a chance to shoot the Orion Nebula for the first time since I started imaging. After months and months of clouds and full moons during the only clear evenings I got a perfect evening. By far the best skies I have had here at the house since we moved here 3 years ago. I have had the scope set for Comet ISON (which didn't make its trip around the sun) so instead of putting my regular configuration back on, I decided to use my Nikon D7000 to shoot M42. I did a variety of sub-exposure times to compensate for the high range of lighting in this region so have subs ranging from 60 seconds to 15 minutes with a total of 8 hours. Instead of going into how I layered all of those to get the detail from core to dust I want to show just how much dust really was captured.
I started off using my normal processing steps (i.e. stack, run through my Photoshop Action set, color correct, some manual stretching, possibly GradientXTerminator, a few other actions, noise reduction) I did these and then used a plugin I have and occasionally use for my normal photography business called Color Efex Pro. There are a few of the steps in there I have found useful for certain astrophotography targets so gave them a try. Using Detail Extractor, Tonal Contrast, and Pro Contrast I was able to tweak out a bit more of the dust and get a nice looking final image (you can see higher res on my website).
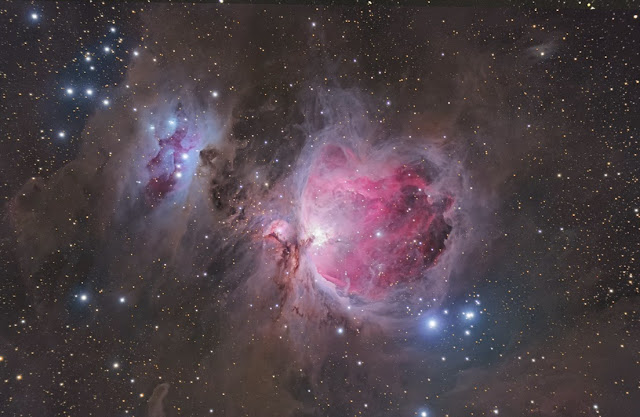

I started off using my normal processing steps (i.e. stack, run through my Photoshop Action set, color correct, some manual stretching, possibly GradientXTerminator, a few other actions, noise reduction) I did these and then used a plugin I have and occasionally use for my normal photography business called Color Efex Pro. There are a few of the steps in there I have found useful for certain astrophotography targets so gave them a try. Using Detail Extractor, Tonal Contrast, and Pro Contrast I was able to tweak out a bit more of the dust and get a nice looking final image (you can see higher res on my website).
Now is when I started to play some more. I could tell there was more dust to be tweaked out, but was getting to the manageable limit of noise for a final image, but that doesn't mean I couldn't play just to see what was there! I did a few more curves and then brought the image over to my Windows PC where I have another one of the Nik Software suite, HDR Efex Pro. I ran it through there just to see how much of the range I could pull out and was amazed. Obviously the noise overran the image, but the amount of dust in this area was phenomenal. Especially as I had always assumed one needed 15+ hours on it to pull that kind of dust out (and probably would to do that and not have the noise at full size).

Even in this small size, you can start to see all the noise but the dust still looks quite impressive. Amazing what an unmodified DSLR camera, modest telescope, mostly dark skies, and 8 hours of exposure can show that you just can't see when looking up at night!
*note: I do not get anything from the external companies or plugins I mentioned above. I just include them and the links to explain to other astrophotographers what tools I used and help them find them easily if they wanted to check them out. I am not intending on promoting them, more just to be thorough in my processing explanations.
Sunday, August 18, 2013
A full week of astrophotography in the Haute-Alpes, France
I just spent a week down at Olly Penrice's astronomy mecca in Southern France. Crazy me drove down with all of my gear (the whole trip both ways and what driving we did during the day down there totaled 2100 miles!) and much to Olly's amusement set up my "portable" kit on his pad, desktop computer and all.

It was an absolutely gorgeous week and I got somewhere around 46.5 hrs of data total on 5 separate targets plus a few Milky Way shots with my DSLR on a tripod as I sat and watched the meteor shower and enjoyed the clear summer evenings. I do have some meteor widefields I have yet to stack and process as well as some more Milky Way shots, but here is the one I have done that I like the most.


I started on vdb126 as I love dark nebula regions and rarely image them. I did this for part of the first night and then moved on. It needed (and still does) some more data, but I had other priorities for most of the imaging time and just wanted something to show for this region.

Over the next 6 nights I worked on the remaining targets depending on where they were along the southern horizon, the slowly increasing moon, and how much data I had gotten on them yet. Here are the images I got over the week. I have a little more integrating and work to do on a few of them, but they are mostly processed.
Helix Nebula (LHaRGB):

Cocoon Nebula (LHaRGB):

Trifid Nebula (LRGB):

NGC 6559 (LRGB):

All were taken with my Orion EON80ED scope, Atik 314L+ camera, and Astronomik Filters while being piggybacked on my CPC800XLT on a wedge. More integration time details are available on my website although some of the time on the Helix I have stacked with a few other subs I got at a star party a while back which added to the 46.5 hour total from this week by 4 hrs making 50.5hrs for these 5 images. Could not have been a more perfect astrophotography week by my standards and it was nice to get the scope out and running again as it has just been collecting dust for the past 5 months or so as other things have taken priority. Well worth the year it took to book, plan, and actually get down to these amazing dark skies for a whole week of nothing but astrophotography by night and touring around the wonderful little towns in the area, hiking, and shopping during the day!
Friday, April 13, 2012
Blogging fell by the wayside
I have been incredibly busy since Christmas and unfortunately forgot to make any posts as a result. I have done some astrophotography and enjoyed the few clear nights England provided. Here are a few of the objects I imaged over the last few months:
vdb14 was a bit of a challenge for me. It is a faint bit of nebulosity in the constellation Camelopardalis. You don't see many images of it so I wasn't quite sure the orientation the camera should be in initially but that was sorted after one sub. The main problem is my scope/image train does not necessarily like broadband emissions, and in particular the blue wavelength. I get bloated stars on all blue and Luminance frames which make processing especially difficult. This is the reason I tend to stick to narrowband images for the time being. Despite these issues, I was thrilled with how it turned out.
The all-too-familiar Horsehead Nebula. I hadn't imaged this since I first began astrophotography and thought it about time I hit it again. I wanted to get the depth and detail that Hydrogen-alpha provided but also not lose the blue reflection nebaul below the HH. As always in this region, keeping Alnitak (off frame to left) from ruining the photo is always a fun challenge. I think I managed to succeed fairly well with this final result.
I also decided I wanted to try out a few more planetary nebulas. I only got one managed with out few clear nights but it provided enough of a challenge. I shot it in narrowband so have no star colors, something which I would like to eventually remedy, but the depth and detail of the Owl Nebula itself made me happy. This is an easy nebula to have washed out and not get any of the inner detail/stars. It was a processing challenge to keep that and bring out the rarely seen outer OIII halo, but I am always up for a challenge (even if I do not always succeed). Here was the final result, although I do wish to revisit this in RGB to add some star colors and perhaps better nebula color as well.
vdb14 was a bit of a challenge for me. It is a faint bit of nebulosity in the constellation Camelopardalis. You don't see many images of it so I wasn't quite sure the orientation the camera should be in initially but that was sorted after one sub. The main problem is my scope/image train does not necessarily like broadband emissions, and in particular the blue wavelength. I get bloated stars on all blue and Luminance frames which make processing especially difficult. This is the reason I tend to stick to narrowband images for the time being. Despite these issues, I was thrilled with how it turned out.
 |
| vdb14 |
The all-too-familiar Horsehead Nebula. I hadn't imaged this since I first began astrophotography and thought it about time I hit it again. I wanted to get the depth and detail that Hydrogen-alpha provided but also not lose the blue reflection nebaul below the HH. As always in this region, keeping Alnitak (off frame to left) from ruining the photo is always a fun challenge. I think I managed to succeed fairly well with this final result.
 |
| Horsehead Nebula |
 |
| M97 - Owl Nebula |
I don't do many galaxies, mainly due to the blue bloat I mentioned earlier but am trying to expand my repertoire and so had a crack at M106 in RGB. A slew of new processing techniques and new "beta" actions I created helped me out with this one and although I had to do alot of work to keep the color manageable (esp in the blue wavelength) I think it paid off:
 |
| M106 |
And now to end on something in our solar system. I got a Philips SPC900NC webcam and a Televue 3x barlow to start to learn planetary imaging. Man, its tricky! I did manage to finally get Mars looking like Mars and will call that a successful planetary attempt even though it isn't the greatest and is still very grainy. Hopefully I will have more and will probably have a whole blog on planetary imaging at some point.
 |
| Mars - 29 Mar 2012 |
For the British winter, I did manage a decent amount of astrophotos among everything else I was doing, to check out more see my website at http://www.eprisephoto.com/astrophotography.
Hopefully will have a proper blog post soon!
Monday, December 5, 2011
Parfocal filter test #1
I always wondered this, but as I didn't have a motorized filter with readable steps (until now) I wasn't able to do any testing on my filters previously. Since the moon is lovely and bright tonight killing most of my imaging plans I figured I would do some focus tests with my new Moonlite focuser. After letting the scope cool to the nice chilly evening (whilst my toes froze nice and solid as well) I ran through my Astronomik set (LRGB and Ha,SII,OIII) and not only did FocusMax's "focus" button but then dug around a few steps each way to find the best focus for each filter. Happy to say that the "focus" button on FocusMax got the focus within 1-2 steps of best focus so gotta say that I am happy to use the automated routine in the future.
Now for the results.
Filter set: Astronomik Type IIC broadband and narrowband filters
Scope: Orion EON80ED
Camera for testing: Atik 314L+
Moonlite Focuser
Filter Wheel: Atik EFW2
Camera temp: -20C
Ambient temp at time of test: 3.3C
Position at "best" focus for each filter at time of testing:
Lum: 10681
Red: 10679
Green: 10676
Blue: 10719
Ha: 10683
SII: 10686
OIII: 10683
All in all, I say that is pretty good (except for the blue filter of course, which I knew already had issues) ... All others were within 5 steps of each other with the Luminance being pretty well centered between them. I am happy to see how close to parfocal all 3 narrow bands are and how close they are to the Luminance.
With that said, I do have an Astrodon LRGB set on the way and will be interested to see how they perform (at the moment I am staying with the Astronomik NB as I have been happy with them but the Blue on my Astronomik set drives me nuts and if I am gonna change one might as well get the whole set. Once they arrive I plan on doing the same test with them as well and will post those results.
After a few more rounds of testing I will have a reliable focus offset for each filter so I can add that to my automated routine, which should make automated routines easier to setup.
Addition: I got out today and pulled out the caliper to do some measuring.
On my system, the Moonlite Focuser moves 16 microns/step (determined by multiple tests by moving the focuser 100, 250, 500, 1000 steps multiple times and measuring the distance moved/#steps and averaged out the #, although almost all of the measurements were right at 16 so any differences were likely user error on the caliper)
Next, some math to determine the critical focus zone (CFZ).
Formula: CFZ=4.88*λ*f ²
Where λ is the wavelength of light and f(squared) is the focal ratio of the system squared.
Now for the results.
Filter set: Astronomik Type IIC broadband and narrowband filters
Scope: Orion EON80ED
Camera for testing: Atik 314L+
Moonlite Focuser
Filter Wheel: Atik EFW2
Camera temp: -20C
Ambient temp at time of test: 3.3C
Position at "best" focus for each filter at time of testing:
Lum: 10681
Red: 10679
Green: 10676
Blue: 10719
Ha: 10683
SII: 10686
OIII: 10683
All in all, I say that is pretty good (except for the blue filter of course, which I knew already had issues) ... All others were within 5 steps of each other with the Luminance being pretty well centered between them. I am happy to see how close to parfocal all 3 narrow bands are and how close they are to the Luminance.
With that said, I do have an Astrodon LRGB set on the way and will be interested to see how they perform (at the moment I am staying with the Astronomik NB as I have been happy with them but the Blue on my Astronomik set drives me nuts and if I am gonna change one might as well get the whole set. Once they arrive I plan on doing the same test with them as well and will post those results.
After a few more rounds of testing I will have a reliable focus offset for each filter so I can add that to my automated routine, which should make automated routines easier to setup.
Addition: I got out today and pulled out the caliper to do some measuring.
On my system, the Moonlite Focuser moves 16 microns/step (determined by multiple tests by moving the focuser 100, 250, 500, 1000 steps multiple times and measuring the distance moved/#steps and averaged out the #, although almost all of the measurements were right at 16 so any differences were likely user error on the caliper)
Next, some math to determine the critical focus zone (CFZ).
Formula: CFZ=4.88*λ*f ²
Where λ is the wavelength of light and f(squared) is the focal ratio of the system squared.
So, for my f/6.25 system the CFZ is:
Red: 124 microns
Green: 97 microns
Blue: 91 microns
Based on the measurements I did that showed each step was 16 microns, the CFZ in steps for each color (rounded down) is:
Red: 7 steps
Green: 6 steps
Blue: 5 steps
Not a lot of room for error, only 2-3 steps on either side of the focus point. Makes me even happier that I got the motorized focuser as finding that 91-127 micron sweet spot by hand was exceedingly difficult (even with a Bahtinov mask)
Note: These tests are done on my actual imaging system, not an "ideal" test setup. I find it hard to find results on average setups as "tests" are generally done on apochromatic scopes and very high-end equipment. That is why I like to share my test results on my modest equipment. These are not "scientific" and are done just as I state. I do them for others who have modest setups and would like to find results on setups similar to their own.
Red: 124 microns
Green: 97 microns
Blue: 91 microns
Based on the measurements I did that showed each step was 16 microns, the CFZ in steps for each color (rounded down) is:
Red: 7 steps
Green: 6 steps
Blue: 5 steps
Not a lot of room for error, only 2-3 steps on either side of the focus point. Makes me even happier that I got the motorized focuser as finding that 91-127 micron sweet spot by hand was exceedingly difficult (even with a Bahtinov mask)
Friday, November 4, 2011
Beta Actions available for testing
I have a few actions up for beta testing. I will do this occasionally as I am developing some for Annie's Astro Actions or just for my own personal use in processing (which is how these came about). I am considering adding them to the action set, but for now they are up for free for anyone willing to test them out and send me their thoughts/problems/suggestions.
In this first beta set are three actions: Hubble Palette Creation, Deconvolve, & Boost Star Color.
To read a short description of them and to download, please go to the new "Beta Action" page, coated here: http://www.eprisephoto.com/beta-actions . . . please remember to send me your notes if you download them!
Thanks!
In this first beta set are three actions: Hubble Palette Creation, Deconvolve, & Boost Star Color.
To read a short description of them and to download, please go to the new "Beta Action" page, coated here: http://www.eprisephoto.com/beta-actions . . . please remember to send me your notes if you download them!
Thanks!
Wednesday, October 19, 2011
Nikon D7000 for astrophotography: Review
Note: This review can be downloaded as a pdf at: http://www.eprisephoto.com/nikon-d7000.pdf

Before I did that I did a quick process of an uncalibrated single 10 minute sub of M31 just to get a “before”. This is a crop of the edge of the galaxy. No darks, flats, or bias frames and just a few processing steps comprised of levels and curves.
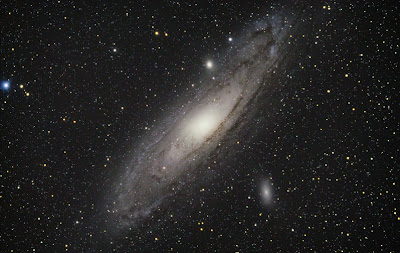
Although my first astrophotos were taken with a DSLR I quickly steered clear of DSLR astrophotography for a few reasons. First, I use my camera (at the time a Nikon D40) for my regular photography jobs and therefore was not going to get it “astro-modded”. Second, it was beyond noisy. Rather than having a field of stars with a few hot pixels, images were coming out as a field of hot pixels resembling a children’s paint splatter painting with a few stars and perhaps a galaxy thrown in for good measure. Dark frames helped, but even proper calibration only did so much for the overly noisy images. Third, I found a used ccd camera for a good deal and after trying it out once, despite the limited FOV from a small chip, found it much better in terms of image quality and lack of noise. I see fantastic results from DSLRs so I know it can be done, but my few experiences had been nothing more than an exercise in frustration. Fast forward a few years and I found myself upgrading to a Nikon D7000 camera. At the time, I had no thoughts of resuming DSLR astrophotography when I purchased it, but after a few months I decided to give it a go.
Testing out the D7000:
After attaching the D7000 to my scope and setting up the DSLR-USB IR sensor so I could set up a sequence via the computer I set about focusing. The D7000 has “Live View” which I was going to use for focus but once I switched to it I realized that while I could see the star I wanted to focus on, it was going to be too dim to accurately focus. I was able to get it close but then switched the live view off, put on the Bahtinov mask, and took a 2 second exposure. It was close enough that it only took me a few moments to fine tune the focus and lock the scope. I found the guide lines in the viewfinder when the shutter is pressed (which light up a dim red) very useful for framing my intended target of the night, M31. I set my ccd up as an autoguider and set “DSLR Shutter” (the program I use on the computer to control the IR sensor on the DSLR-USB IR to take a 10 min exposure and ... nothing. No shutter click to let me know the image had begun. I had the menu settings to “Quick Response Remote” but the D7000 has a roll bar underneath the left selector wheel (where you select M for manual, Auto, etc) that you also have to roll over to the remote picture. Once I had done that, I reset “DSLR Shutter” and off it went. 10 minutes later I checked the result and was pleasantly surprised. At ISO400 (I kept the ISO fairly low since the moon was going to be coming up soon and because I was used to a VERY noisy DSLR in the D40) the image was crystal clear. Andromeda looked great as did the stars and color across the whole image. Obviously the preview screen was always bound to look better than the full-sized image but no glaring problems were obvious so I set “DSLR Shutter” to take a set of 12 ten minute subs and let it shoot. I went back out 2 hours later to find that battery hadn’t even drained 1/4 of the way (also a problem I had with series’ with the D40) and I now had 13 subs of M31. I took a few darks for good measure and brought them all in to check out.
D7000 Settings:
Before I get into the results of the evening I want to give you the settings and menus where I set those for the session. These are the only camera settings I changed, everything else was left to its default and no “in-camera noise reduction” was used.
Exposure: | M (Manual) | Roll wheel on top left of camera |
ISO: | 400 | Press “ISO” button on left of preview screen, turn roll bar in front of shutter/on-off button |
Image Quality: | NEF (RAW) | MENU->Shooting Menu->Image Quality |
Shutter trigger: | Quick-Response Remote | Two places: Shooting Menu->Remote control mode->Quick Response Remote, Secondary roll wheel on top left of camera->remote picture |
Shutter Speed: | BULB | Right thumb roll bar |
Results:
They say a picture is worth a thousands words, so I will show these results I will start by showing you what a single 10 minute dark sub looked like. All I have done to this was convert it from RAW to a tiff file and then used levels to stretch it so you can see the noise pattern (otherwise it looked completely black at this size).The darks look pretty good to me, especially for a 10 minute sub. Once I combined the 6 I took after my session I had a nice Master Dark to use for calibration.

Before I did that I did a quick process of an uncalibrated single 10 minute sub of M31 just to get a “before”. This is a crop of the edge of the galaxy. No darks, flats, or bias frames and just a few processing steps comprised of levels and curves.

I was floored that even a single 10 minute sub with a mild amount of stretching had such little noise! Granted it was a cool evening (40 degrees fahrenheit) but the inherent noise of the D7000 is exponentially lower than the older D40. The noise was so low in the single stretched sub that I went ahead and did a stack of the uncalibrated subs. Hot pixel streaks were very minimal and in a pinch I believe I could even get away without shooting darks on a cool fall/winter imaging evening.
I did, however, apply the Master Dark to the subs before I brought them over to be de-Bayered, aligned, and stacked for the final processing. I used several programs to compare how the image looked from the raw stack (Registar, Maxim DL, and Nebulosity), all three came out looking fairly decent but I used the Maxim DL stack for the final process as I found it did a better job on the balance of colors from the Bayer matrix. I used solely Photoshop CS5 for the post-processing, although I do have several plug-ins in addition to my own action set that I use for the processing. I ended up not using any noise reduction in the final process.
Conclusions:
For a “first light” for the camera, astrophotography-wise, I would have to say that the D7000 has completely changed my opinion of DSLR astrophotography. Not only does the camera produce crisp, clean images that are relatively noise-free (at least compared to my previous experience with DSLR astrophotography), but the efficient use of the battery allows an evening of shooting without having to worry about the battery going out mid-exposure. As I had this only a fairly low ISO setting (400) I might have to try to shoot some fainter nebulosity with a higher ISO in the future and expand my DSLR astro-gallery. All in all - a great camera in the day or night that I would highly recommend.
Higher Res final image can be found here: http://www.eprisephoto.com/galaxy/h23732f43
Higher Res final image can be found here: http://www.eprisephoto.com/galaxy/h23732f43
Thursday, October 13, 2011
I need more power Scotty! . . . aka "How to build the AstroPig 140"
I have been increasingly frustrated by my power tanks lately, mainly in that I have to use 2-3 of them just to get a full night of imaging with my scope, ccd, filter wheel, auto guider, and dew heaters all running. This, and the largest one I have was 17Ah and after multiple moves (and consequently being drained of power for months at a time during the move) they do not like to hold a charge anymore. My solution: build a power box.
I have done a full writeup of my requirements, calculations, parts, and the build which can be found in this pdf document: http://www.eprisephoto.com/power-box-project.pdf
In short, I have made a power box with a 140Ah 12v deep cycle battery, 6 cigarette lighter-type power sockets, a 7 port USB hub, and two 120v GFCI outlets which are hooked to a 450W power inverter.
I have red lights that shine to the side and down to help with navigating around the scope without tripping over anything, a red LED voltmeter on the front panel and a Battery Tender charger built in as well.
The most difficult part of the build was planning (as is typical with projects) partly as I had not done any wiring projects in quite a while and wanted to be thorough planning out the wiring and parts to map sure it will be safe, all work, and as inexpensive as possible. I went with Anderson PowerPoles for the wiring and distribution box so I wouldn't have to do any soldering and so it would make it simpler to fuse and exchange parts as necessary. Although using these did increase my costs it made the wiring portion significantly easier and, to me, well worth the extra expense. Other than these I did a lot of shopping around and made good use of eBay and other internet sites to find parts. The battery was one of the few things I had to source locally but managed to get it delivered for free which was very nice as a 140Ah battery is quite heavy.
It took a few weeks to get all the parts in, build the box, and wire everything but it is all together and running. I learned a good bit between all of the planning stages and testing everything as I was wiring it all together but it was very fun and nice to have a home-built power box!
I was told it looks like a squat little pig so it has affectionately been named the "AstroPig 140"
Feel free to download my pdf and read more in-depth about the build.


I have done a full writeup of my requirements, calculations, parts, and the build which can be found in this pdf document: http://www.eprisephoto.com/power-box-project.pdf
In short, I have made a power box with a 140Ah 12v deep cycle battery, 6 cigarette lighter-type power sockets, a 7 port USB hub, and two 120v GFCI outlets which are hooked to a 450W power inverter.
I have red lights that shine to the side and down to help with navigating around the scope without tripping over anything, a red LED voltmeter on the front panel and a Battery Tender charger built in as well.
The most difficult part of the build was planning (as is typical with projects) partly as I had not done any wiring projects in quite a while and wanted to be thorough planning out the wiring and parts to map sure it will be safe, all work, and as inexpensive as possible. I went with Anderson PowerPoles for the wiring and distribution box so I wouldn't have to do any soldering and so it would make it simpler to fuse and exchange parts as necessary. Although using these did increase my costs it made the wiring portion significantly easier and, to me, well worth the extra expense. Other than these I did a lot of shopping around and made good use of eBay and other internet sites to find parts. The battery was one of the few things I had to source locally but managed to get it delivered for free which was very nice as a 140Ah battery is quite heavy.
It took a few weeks to get all the parts in, build the box, and wire everything but it is all together and running. I learned a good bit between all of the planning stages and testing everything as I was wiring it all together but it was very fun and nice to have a home-built power box!
I was told it looks like a squat little pig so it has affectionately been named the "AstroPig 140"
Feel free to download my pdf and read more in-depth about the build.


Sunday, August 21, 2011
Two years and a Pelican
Two years ago I could not even tell you what someone meant if they said "narrowband image" let alone expect that I would, in a relatively short amount of time, learn enough about astrophotography that I would be undergoing a project that would take all summer and result with a total of 3 entire days worth of exposure time for one photo. I have definitely been bitten by the astrophotography bug and although I am doing so on a very limited budget, am endeavoring to make the most of what I have.
On May 20th I started what would be this image. My first full-narrowband multi-panel mosaic began with the Pelican's head of the Pelican Nebula in Hydrogen-alpha. When I started imaging that night, I did not PLAN to be doing this mosaic. I just wanted to image the Pelican Nebula. As the evening went on and the sub-exposures stacked up I began thinking: I wasn't even getting the whole Pelican in this image and with my current setup this is as wide-field as I can get using the ccd camera - why don't I do a mosaic. I went in and began doing the calculations. For the field of view I was considering it would be around 18 panels, give or take, depending on just how far I wanted to extend it. Keep in mind that to do a full-narrowband image that would mean doing this mosaic 3 times over (note: after the Ha was completed I came up with an alternate way to do the SII & OIII - more on that later). On top of this, I am currently living in England. A country not exactly known for clear skies and in the summer there are very few hours of darkness due to the high latitude. Oh well! I might as well make this an extended project and off I went. I declared my intentions on the two astronomy forums I frequent just in case I began to let the enormity of this venture get the better of me they could keep me going. As luck would have it, and much to my surprise, I ended up getting quite a string of clear nights so was able to make relatively quick work of most of the Ha layer. Then things stalled for a while, mainly due to lots and lots of rain and clouds. It took me from May until August to finish up the Ha layer, which ended up being 18 panels just as I planned (17 completed it, but one was really noisy due to bad seeing and I didn't like how it merged with those around it so I did an additional one that overlapped part of the area and the surrounding panels).
I now had to do this all over again twice more ... or did I? I realized that the way I was planning on processing this meant that I would be using the Hydrogen-Alpha layer for all the detail and just needed the color-data from the OIII & SII as I was going to do a tone-map of all 3 for the colors. I had seen on my UK forum an adapter that allowed me to connect my Nikon lenses to my Atik ccd. I began to think this might just work and would cut down months on the total time I needed. I ordered the adapter and figured up the field of view requirement to determine which lens I needed with my small-chip ccd. Turns out that my 105mm Nikon lens would be perfect. I still wasn't convinced that it would work so once the adapter came in I spent a night doing a proof-of-concept with the OIII filter. I got a nights worth of data and came in to process a bicolor image to see if my plan would work. Voila! It DID! So instead of doing the 18 panels an additional 2 times I just needed a few clear nights each for the OIII & SII and would get the whole frame in each sub.
More rain, and a full moon delayed another week, but I was able to get around 7 hrs for each channel and went to process it to see if I would require more. I have determined I do not - that what I got would work well although normally the OIII & SII colors would still be a bit noisy at this point, since I was doing a tone-map that really didn't matter. So, at my 2 year anniversary of starting astrophotography my narrowband mosaic of the North American and Pelican Nebulas is complete. I have mapped the color in a modified Hubble Palette.
Here are the image details:
As soon as they finish uploading, the image will be available on my website under the Nebula section and a Zoomable to 1:1 version so you can see more details is located HERE. Currently only the Ha channel is located on the links. I will update this once the uploads are complete.

On May 20th I started what would be this image. My first full-narrowband multi-panel mosaic began with the Pelican's head of the Pelican Nebula in Hydrogen-alpha. When I started imaging that night, I did not PLAN to be doing this mosaic. I just wanted to image the Pelican Nebula. As the evening went on and the sub-exposures stacked up I began thinking: I wasn't even getting the whole Pelican in this image and with my current setup this is as wide-field as I can get using the ccd camera - why don't I do a mosaic. I went in and began doing the calculations. For the field of view I was considering it would be around 18 panels, give or take, depending on just how far I wanted to extend it. Keep in mind that to do a full-narrowband image that would mean doing this mosaic 3 times over (note: after the Ha was completed I came up with an alternate way to do the SII & OIII - more on that later). On top of this, I am currently living in England. A country not exactly known for clear skies and in the summer there are very few hours of darkness due to the high latitude. Oh well! I might as well make this an extended project and off I went. I declared my intentions on the two astronomy forums I frequent just in case I began to let the enormity of this venture get the better of me they could keep me going. As luck would have it, and much to my surprise, I ended up getting quite a string of clear nights so was able to make relatively quick work of most of the Ha layer. Then things stalled for a while, mainly due to lots and lots of rain and clouds. It took me from May until August to finish up the Ha layer, which ended up being 18 panels just as I planned (17 completed it, but one was really noisy due to bad seeing and I didn't like how it merged with those around it so I did an additional one that overlapped part of the area and the surrounding panels).
I now had to do this all over again twice more ... or did I? I realized that the way I was planning on processing this meant that I would be using the Hydrogen-Alpha layer for all the detail and just needed the color-data from the OIII & SII as I was going to do a tone-map of all 3 for the colors. I had seen on my UK forum an adapter that allowed me to connect my Nikon lenses to my Atik ccd. I began to think this might just work and would cut down months on the total time I needed. I ordered the adapter and figured up the field of view requirement to determine which lens I needed with my small-chip ccd. Turns out that my 105mm Nikon lens would be perfect. I still wasn't convinced that it would work so once the adapter came in I spent a night doing a proof-of-concept with the OIII filter. I got a nights worth of data and came in to process a bicolor image to see if my plan would work. Voila! It DID! So instead of doing the 18 panels an additional 2 times I just needed a few clear nights each for the OIII & SII and would get the whole frame in each sub.
More rain, and a full moon delayed another week, but I was able to get around 7 hrs for each channel and went to process it to see if I would require more. I have determined I do not - that what I got would work well although normally the OIII & SII colors would still be a bit noisy at this point, since I was doing a tone-map that really didn't matter. So, at my 2 year anniversary of starting astrophotography my narrowband mosaic of the North American and Pelican Nebulas is complete. I have mapped the color in a modified Hubble Palette.
Here are the image details:
|
As soon as they finish uploading, the image will be available on my website under the Nebula section and a Zoomable to 1:1 version so you can see more details is located HERE. Currently only the Ha channel is located on the links. I will update this once the uploads are complete.

Thursday, August 18, 2011
Shortlisted for Royal Astronomy Photographer of the Year 2011
On a whim and just to say I threw my name in the hat I submitted 5 photos from the past year into the Royal Astronomy Photographer of the Year competition put on by the Royal Observatory at Greenwich. I have only been doing astrophotography for a little less than 3 years now so to my shock and delight I received an email a few weeks ago saying that 3 of my images had been short-listed! I am beyond excited just to have even been shortlisted and on top of that got an invite to the awards ceremony and exhibition opening on September 8th at the Royal Observatory.
I am going to have a great time at the exhibition and meet fellow astrophotographers and I am honored to have even been shortlisted. Now I get to anxiously wait until September 8th!
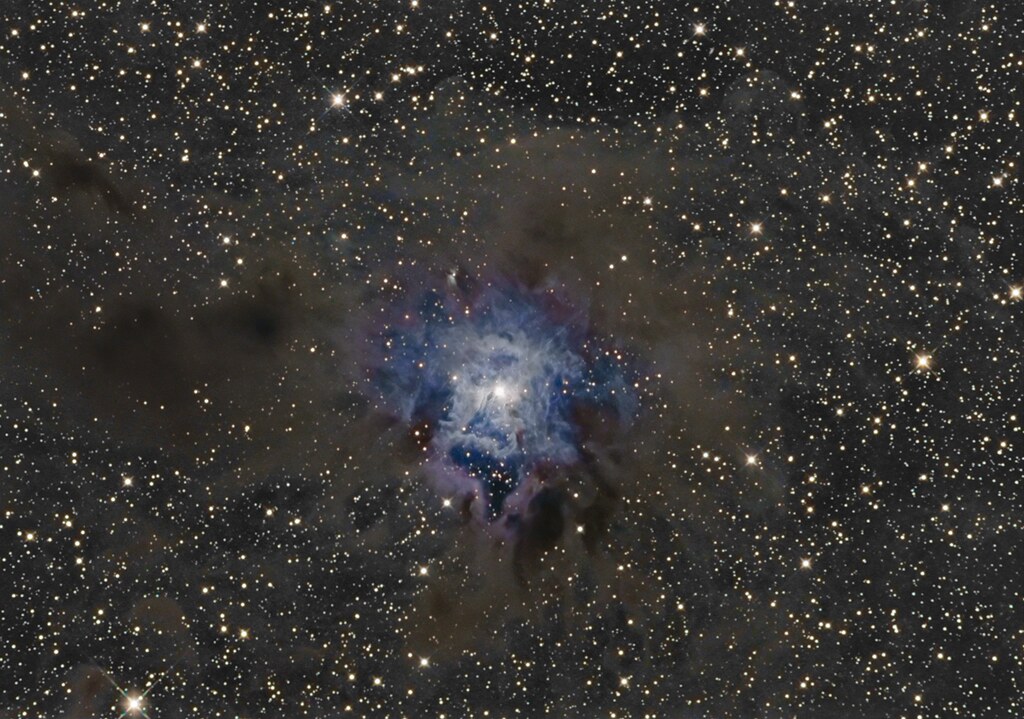
Here are the 2 of the 3 images I had shortlisted:


I am going to have a great time at the exhibition and meet fellow astrophotographers and I am honored to have even been shortlisted. Now I get to anxiously wait until September 8th!
Here are the 2 of the 3 images I had shortlisted:

Monday, August 8, 2011
North America & a Pelican
I have been continuing work on my narrowband mosaic project. I first started imaging on this project on May 21, 2011. In the early morning hours of August 7 I finally got 1/3 of the way through by finishing the Ha portion of the mosaic. I still have a ways to go to colorize the image with SII & OIII, but I am very happy with the Ha and looking forward to the final result.
I have been continuing to update the zoomable version located at http://mosaicproject.eprisephoto.com
Very large, high-res prints are now available on my website as well at: http://www.eprisephoto.com
Here are the image details:

I have been continuing to update the zoomable version located at http://mosaicproject.eprisephoto.com
Very large, high-res prints are now available on my website as well at: http://www.eprisephoto.com
Here are the image details:
Image type: 17 panel mosaic
Camera: Atik 314L+
Guide camera: Starlight XPress Lodestar
Scope: Orion EON 80ED
Filter: Astronomik Ha 12nm
Integration time (per panel): 10 x 1200sec
Integration time (total): 56 hrs 40 min
Camera: Atik 314L+
Guide camera: Starlight XPress Lodestar
Scope: Orion EON 80ED
Filter: Astronomik Ha 12nm
Integration time (per panel): 10 x 1200sec
Integration time (total): 56 hrs 40 min

Friday, July 15, 2011
When the dream is reality
A week ago I stood on the shore of the Turning Basin at Kennedy Space Center's launch Press Site and watched a Space Shuttle hurtle four Americans into space for the last time. NASA, as the Robert Brockway from Cracked so eloquently put it, had "strapped human beings to an explosion and tried to stab through the sky with fire and math" for the last time in the foreseeable future. Fourteen years ago I got to see Atlantis lift off, turning night into day, and solidifying my life-long and enduring love for space. It is a memory I have held ever since and will never forget. Although, as the years went by I wondered just how much of that memory had been fantasticalized (yes, I believe I made that word up) in my mind and how much was how it had really happened. Did the sound wave really shake you to the core when it hit? Was the emotion of watching a launch as strong as I remembered? Did a Space Shuttle launch really dare to challenge anyone to NOT love space travel?
On July 8, 2011 I not only got to witness history, but realized that a Space Shuttle launch really WAS everything I had remembered and held on to for fourteen years. There is something about seeing a plane-like ship, strapped to rockets that you can't turn off, light up the sky even in the daytime and make its way from right in front of you to orbit around earth in just a few minutes. As John Oliver put it on "The Daily Show", "That was objectively INCREDIBLE!"
I realize that the Space Shuttle itself is 30 years old and the design is closer to 40 years old. It needs replacing. We need something that can do more than just orbit Earth. We have made very little progress as far as space travel since we first stepped on the moon. (yes we built MIR, the Hubble telescope, & the ISS but those, while technological advances, were not space travel by humans. MIR & the ISS merely orbit the same celestial body we currently occupy) We not only have not sent humans back to the Moon since the 70s, but haven't ventured beyond Earth's orbit. Why not? Technology has advanced so significantly in the past 40 years that the lack of human exploration in our Solar System still baffles me. I am hoping that the leaning towards privatizing space travel will give Earthlings the kick we need to remedy this failing on our part.
With all that said, I will always have an eternal memory of getting to watch the Space Shuttle launch. They say a picture is worth a thousand words. Although I definitely do not have the words to do justice to the launch, I also do not think a photo (or video for that matter) does it justice. However, here are a few more of my shots of my weekend with Atlantis and STS-135.
Ad Astra!!


On July 8, 2011 I not only got to witness history, but realized that a Space Shuttle launch really WAS everything I had remembered and held on to for fourteen years. There is something about seeing a plane-like ship, strapped to rockets that you can't turn off, light up the sky even in the daytime and make its way from right in front of you to orbit around earth in just a few minutes. As John Oliver put it on "The Daily Show", "That was objectively INCREDIBLE!"
I realize that the Space Shuttle itself is 30 years old and the design is closer to 40 years old. It needs replacing. We need something that can do more than just orbit Earth. We have made very little progress as far as space travel since we first stepped on the moon. (yes we built MIR, the Hubble telescope, & the ISS but those, while technological advances, were not space travel by humans. MIR & the ISS merely orbit the same celestial body we currently occupy) We not only have not sent humans back to the Moon since the 70s, but haven't ventured beyond Earth's orbit. Why not? Technology has advanced so significantly in the past 40 years that the lack of human exploration in our Solar System still baffles me. I am hoping that the leaning towards privatizing space travel will give Earthlings the kick we need to remedy this failing on our part.
With all that said, I will always have an eternal memory of getting to watch the Space Shuttle launch. They say a picture is worth a thousand words. Although I definitely do not have the words to do justice to the launch, I also do not think a photo (or video for that matter) does it justice. However, here are a few more of my shots of my weekend with Atlantis and STS-135.
Ad Astra!!


Monday, July 11, 2011
STS-135 NASA Tweetup. The Final launch.

Not this time.
26 hrs since I woke for the travel from my home in England to Orlando, Florida for the NASATweetup I attempted to lie down to sleep for a few hours before a group of us met to carpool to Kennedy Space Center. 3 alarms and a wake up call were scheduled just to make sure I didn't oversleep. None would be needed. Every half hour on the dot my subconscious woke me to double check that I hadn't overslept and missed my chance to be a part of history. At 0400 I gave in to my subconscious and began preparing for the day. 3 cameras, 1 HD video camera, multiple lenses, laptop computer, smart phone, and the dream a grown adult still holds on to like a child all to meet ....
...Atlantis.

A nice pre-dawn drive from Orlando on 7 July for the 1st day of the Tweetup. We arrive at the press credential building to get our Tweetup IDs and walk out into the soup of Florida. 110% humidity and feels like you are swimming instead of walking. A gorgeous sunrise over Kennedy Space Center as we drive towards the VAB and the Countdown Clock. Gorgeous due to the iridescent red and orange sun-rayvery large backlighting the dark clouds billowing on the horizon - an ominous sign for the launch tomorrow but that won't deter us. We press on, make our way to the Twent (Tweetup tent) with a few obligatory stops to get shots of Atlantis on the pad, the VAB, and the Countdown Clock.
The Tweetup begins.
 Introductions by the 150 tweeps each one more impressive than the last. Man these are some smart people.
In walk two astronauts (Mike Massimino & Doug Wheelock) and, as only can in a group like this, they are mobbed like celebrities for autographs and photos. They are there for the upcoming program of Sesame Street to interact with Elmo. Yes, I get to meet Elmo! I think my little girl is the most excited about this particular part of the program at her age.
 Our favorite red monster was getting ready for the live taping and as the time til air neared we hear Elmo yell at us all to "SIT DOWN!!!" ... kinda amusing to get yelled at by a Sesame Street character.
Elmo's interview with the astronauts was amusing - he was quite the smart-ass and it provided more than one good laugh in the Tweetup tent. Q&A time rolled around and I had promised Audrey I would ask Elmo something for her so I raised my hand and got to ask my question,
 "My 2 yr old Audrey wants to know what your favorite planet is" ...
Elmo: "The Milky Way BABY!" nudges Massimino "That's a planet right?"
Massimino: (through unbridled laughter) "close enough Elmo".
Elmo: "Astronaut Mike, is Mars a planet?"
"Yes, Elmo, Mars is a planet"
"Then ... Mars BABY"
The whole room was cracking up. Go Elmo!
After Elmo had to leave we got to have Q&A time with the astronauts. I especially enjoyed Doug Wheelock (on Twitter @Astro_Wheels) speaking to us. His enthusiasm for space and his honesty was refreshing. As he talked about looking back onto Earth while working in space and how distracting Earth can be because of its beauty so they look forward to orbital sunset only to realize that with city lights, auroras, etc the Earth is just as distracting at night as it is during the day. He also told us about his experience with Soyuz and how "Coming home in the Soyuz is like getting in a barrel to go over Nigra Falls, but before you go over they light it on fire". It really gave us a sense of what the experience was like.

 Now when I say KSC tour I don't mean your everyday, go-buy-a-ticket-at-the-Visitor-Center tour, I mean we got THE TOUR. My bus headed straight out to the launchpad. Yes, THE launchpad where Atlantis was sitting, poised for her rocket ride into space the following day. It was time for the RSS (rotating service structure) Retraction and we got front row seats. We arrived to Atlantis still all safely hidden away inside the RSS. Protected & Sheltered. As we stand in the field next to her we slowly begin to see her emerge. A wingtip, now a wing, "I think I can see her side!" someone enthusiastically hollers, soon we can indeed make out the oh so familiar shape as her cocoon is drawn away. The RSS finishes its retraction and there sits Atlantis. We all take our photos and don't want to leave. @Astro_Wheels shows up for a few more photos with us and we are all told we have to go. NOOOO! Ok, a few more minutes as they see the pleading faces of 150 adults who all of a sudden (again) are acting like kids who don't want to leave the playground. They take a quick group shot of us with Atlantis in the background (although it was haphazard and not organized so some people (ahem ... me and a bunch others) were jammed in the back with no chance of being seen by the camera) but was a nice thought. We finally get shuffled back onto the buses and ours heads over to the Saturn V building.

The Saturn V building was part of the everyday tour and as such was beyond packed with people. After getting elbowed by more than a few I decided my cameras weren't safe and went outside to sit for the 15 minutes we had left there and just relax. Wow - hadn't gotten a chance to sit and relax since we arrived. It was kinda nice. The rain started again.
 It was getting late in the afternoon but we still had one more stop: the VAB. For those of you who have ever seen a photo of Kennedy Space Center, the Vehicle Assembly Building is the HUGE building where they, as one would expect, assemble the Shuttle onto the ET and SRBs. When I say huge, I mean that at one point, this building was the largest by volume in the WORLD. It still stands as 4th largest (a few of the Asian mega-skyrises are larger now) but this building is still, by far, the largest building I have ever seen. Not only is it tall, it is a giant rectangle so the volume is just massive (129,428,000 cubic feet). When you first even near KSC by road you see it dozens of miles away, and even once you are through the gates and you think you are close, you still drive another 15 minutes until you are there. Its just that big. It was amazing to stand in it, no workers around (say for the one showing us the building) no parts or shuttles around as the Space Shuttle is no more. A giant empty shell. Makes you wonder when they will be using this building again . . . hopefully soon.
We all go to exit the VAB and are finished for the day, say for one problem: we are locked in. Its 6pm and apparently security forgot that we were touring in there and locked it all up to go home for the day. Not the worst place to be stuck but we were all tired from such an amazing day and kinda ready to go to our hotels and crash for the night. They eventually showed back up after a few calls and then the keycard and pin device weren't unlocking the first set of gates to let us out after they came in. SNAP! Another security guard showed up and tossed the first their keys through the gate and thankfully we were free :)
What a day!
Despite the forecasts and NASA's odds (70% chance of a scrub) I was bound and determined to be positive. It WAS going to launch. Then we all get back to the hotel and see that a tropical storm warning was called and headed this way. SNAP! Oh well, we still decide that we will be positive and decide on a 230am departure from the hotel. We wanted to beat the traffic to KSC or at least make sure that we were there for the 5am entry we were allowed.
Launch Day: As I begin the drive I realize that we left WELL early enough. Nobody else was on the road yet. A few rain showers on the earlier part of the drive and then ... the clouds part, rain stops, & we see stars. Atlantis shines in the distance, like a beacon through the storm. The massive VAB sits like a shadowy guardian brother waiting to protect it's offspring should the need arise. The view driving in was awe-inspriting in and of itself. The criss-crossing spotlights on Atlantis could be seen nearly from Orlando, especially when they reflected off of the scattered clouds that remained. We got to the badging office at 330am. Yup - NO traffic for us on the way out. We decide to have an impromptu tail-gate there at the badging office until 5. Someone put some tunes on and we all hung out and chatted, laughed, and hoped that the weather would continue to improve.

To be honest, I was too excited to really pay attention to anything that happened that morning say for a few things. Here they are:
 Seth Green, actor and space enthusiast, makes an appearance and plays Bear McCreary's new song for NASA "Fanfare for STS-135". Seth played it for us (1st time played for anyone) while we watched the astronauts getting strapped into Atlantis. It was a very powerful and moving song. Thanks Seth & Bear!
Bob Crippen, astronaut on STS-1, popped in to talk to us. He got choked up talking about the shuttle program ending and had to stop for a minute to compose himself. It really showed us what this program means to not only current astronauts and NASA employees, but everyone who has ever flown on it. He gave a very good talk, although apparently has something against photos and autographs as he refused everyone's requests and rushed out after he spoke.
Think Geek's Timmy the monkey made a quick appearance. I got a photo of him sitting on my head - It will be on my flickr photos. Silly stuffed monkey.
 We got to stand on the side of the road and wave to the crew of Atlantis in the Astrovan as they headed to the launchpad. GO ASTROVAN! No U-TURNS!!!
A couple quotes I wrote down from other morning talks:
-Astronaut Tony Antonelli on viewing Earth from space: "I wondered why we don't treat ourselves more neighborly."
-NASA Depute Administrator Lori Garver, "This isn't the beginning of the end, it is the end of what was our beginning.
The weather was our nemesis on launch day. NASA went ahead and tanked but the head weather person came to talk to us and pretty much said that we weren't going to launch, although she personally was still hoping for a clearing. Over 1 million people on the Space Coast all had their fingers crossed that the clearing skies we saw beginning before dawn and were still continuing after sunrise would stay and the tropical storm stayed far enough away that the 20 mile "no rain" radius would be met. We made it to the 9 minute hold and it kept going back and forth. Weather was "GO" to cheers, weather was "NO GO" to boos, multiple times. As we looked out of the tent we were seeing clouds, but also blue skies. My spirits were lifted. I had a good feeling. About 10 minutes before the 9 minute hold came to an end and we all headed out to our tripods. A slight altercation occurred over tripod spot "saving" from weeks before via a stick but I won't get into that TOO much as this is a positive thread - but if "Mr $12000 lens who thinks he is better than anyone else and a stick in the ground actually held his spot" is reading this I will say this: I hope your camera jammed during launch" ... anywho, I found a new spot for my tripod as I wasn't going to waste my time on him and some nice tweeps made room for the few of us who got bumped by him. I got my camera and video camera set up as the 9 minute hold ended (although afterwards I realized I forgot to switch back to RAW shooting after the morning twent shooting on jpg...oops) and we all breathed a sigh of relief as most weather scrubs occur in that hold. Maybe we were actually going to get to see the launch! Less than a minute someone yells out. There were no speakers there near the countdown clock and as we were in front of it a ways it was getting frustrating not knowing what the countdown was at. At 31 seconds someone yells "there's a hold, problem with something" ... NOOOOO!!!! Were they seriously going to scrub the launch at 31 seconds?!
It turns out it was more of a pause for dramatic effect (a sensor wasn't reading something and they just had to visually confirm). "Countdown has resumed" ... 30 ... 20 ... we were counting in our heads since we still weren't completely sure what the count was until 10, 9, 8 - we hear some people by the countdown clock start yelling. We ALL join in at "5, 4 ..." I have started my camera and video at 5 and glance through the viewfinder just to make sure I am framed. I see the smoke starting to billow so I leave the camera to take the photos I programmed it to and turn to watch it with my own eyes. "3, 2, 1 ... LIFTOFF" I watch Atlantis start to rise as momentum from the rockets build and as it clears the tower the light from the SRBs are so bright it is almost like looking into the sun. For seconds we just see it, until the sound-wave hits us. When it hit us, it HIT us. Cameras shook, you feel your entire insides rumbling and Atlantis is full speed heading towards the heavens. A beautiful roll and she heads for the cloud deck. Blue skies peek through the clouds, welcoming Atlantis to the skies as we all cheer Atlantis and her crew of 4 on their way to the International Space Station.


The entire crowd, whether it be Tweetup attendees, dignitaries, astronauts, or media were all cheering and a good portion were crying - overcome with the emotion of the moment. We all just watched the final Space Shuttle lift off so beautifully. A site that no human will get to see again. The end of an era and hopefully the beginning of a new one. It is hard enough to describe a launch to someone who has never seen one live. It is so much more powerful and emotional than watching it on tv. You are not only watching it, you are feeling it, you are the launch. Add to it the weight of this event and it really is beyond words. I have had to wait for a few days to even come up with how to express this and still cannot adequately describe what I still feel when thinking of the launch or looking at my photos.
Amazing is a completely inadequate word. It is truly beyond any explanation.
Godspeed Atlantis. I look forward to watching the rest of your mission and a safe return to Earth after your last trip to space and the International Space Station.
note: all photos in this blog were taken by me (except the ones of me - I gave my camera to someone for those) at the NASATweetup and STS-135 launch of the Shuttle Atlantis. © All rights reserved. If you would like to use a photo posted here please contact me first.
More of my photos of the NASATweetup and launch can be found at http://www.flickr.com/akryger once I finish loading them and some will be available on www.eprisephoto.com

A couple quotes I wrote down from other morning talks:
-Astronaut Tony Antonelli on viewing Earth from space: "I wondered why we don't treat ourselves more neighborly."
-NASA Depute Administrator Lori Garver, "This isn't the beginning of the end, it is the end of what was our beginning.
The weather was our nemesis on launch day. NASA went ahead and tanked but the head weather person came to talk to us and pretty much said that we weren't going to launch, although she personally was still hoping for a clearing. Over 1 million people on the Space Coast all had their fingers crossed that the clearing skies we saw beginning before dawn and were still continuing after sunrise would stay and the tropical storm stayed far enough away that the 20 mile "no rain" radius would be met. We made it to the 9 minute hold and it kept going back and forth. Weather was "GO" to cheers, weather was "NO GO" to boos, multiple times. As we looked out of the tent we were seeing clouds, but also blue skies. My spirits were lifted. I had a good feeling. About 10 minutes before the 9 minute hold came to an end and we all headed out to our tripods. A slight altercation occurred over tripod spot "saving" from weeks before via a stick but I won't get into that TOO much as this is a positive thread - but if "Mr $12000 lens who thinks he is better than anyone else and a stick in the ground actually held his spot" is reading this I will say this: I hope your camera jammed during launch" ... anywho, I found a new spot for my tripod as I wasn't going to waste my time on him and some nice tweeps made room for the few of us who got bumped by him. I got my camera and video camera set up as the 9 minute hold ended (although afterwards I realized I forgot to switch back to RAW shooting after the morning twent shooting on jpg...oops) and we all breathed a sigh of relief as most weather scrubs occur in that hold. Maybe we were actually going to get to see the launch! Less than a minute someone yells out. There were no speakers there near the countdown clock and as we were in front of it a ways it was getting frustrating not knowing what the countdown was at. At 31 seconds someone yells "there's a hold, problem with something" ... NOOOOO!!!! Were they seriously going to scrub the launch at 31 seconds?!
It turns out it was more of a pause for dramatic effect (a sensor wasn't reading something and they just had to visually confirm). "Countdown has resumed" ... 30 ... 20 ... we were counting in our heads since we still weren't completely sure what the count was until 10, 9, 8 - we hear some people by the countdown clock start yelling. We ALL join in at "5, 4 ..." I have started my camera and video at 5 and glance through the viewfinder just to make sure I am framed. I see the smoke starting to billow so I leave the camera to take the photos I programmed it to and turn to watch it with my own eyes. "3, 2, 1 ... LIFTOFF" I watch Atlantis start to rise as momentum from the rockets build and as it clears the tower the light from the SRBs are so bright it is almost like looking into the sun. For seconds we just see it, until the sound-wave hits us. When it hit us, it HIT us. Cameras shook, you feel your entire insides rumbling and Atlantis is full speed heading towards the heavens. A beautiful roll and she heads for the cloud deck. Blue skies peek through the clouds, welcoming Atlantis to the skies as we all cheer Atlantis and her crew of 4 on their way to the International Space Station.


The entire crowd, whether it be Tweetup attendees, dignitaries, astronauts, or media were all cheering and a good portion were crying - overcome with the emotion of the moment. We all just watched the final Space Shuttle lift off so beautifully. A site that no human will get to see again. The end of an era and hopefully the beginning of a new one. It is hard enough to describe a launch to someone who has never seen one live. It is so much more powerful and emotional than watching it on tv. You are not only watching it, you are feeling it, you are the launch. Add to it the weight of this event and it really is beyond words. I have had to wait for a few days to even come up with how to express this and still cannot adequately describe what I still feel when thinking of the launch or looking at my photos.
Amazing is a completely inadequate word. It is truly beyond any explanation.
note: all photos in this blog were taken by me (except the ones of me - I gave my camera to someone for those) at the NASATweetup and STS-135 launch of the Shuttle Atlantis. © All rights reserved. If you would like to use a photo posted here please contact me first.
More of my photos of the NASATweetup and launch can be found at http://www.flickr.com/akryger once I finish loading them and some will be available on www.eprisephoto.com
Subscribe to:
Posts (Atom)
Monitor Calibration

The grayscale above presents 24 shades of gray from pure white to solid black. If you cannot see all 24, your monitor needs calibration to view the astrophotos correctly: I recommend the site linked in the image