About the Blog

This blog contains recent projects, activities, and musings about astrophotography and space, to view my main webpage with prints for sale, final images, and Annie's Astro Actions, please visit: www.eprisephoto.com

.

Thursday, November 19, 2009

Processing Comparison of M42

I very quickly learned a few months ago when I started astrophotography that processing made all the difference in shots. Yes, it takes some skill to set up a shot and different equipment can make quite a difference, but where the real photos are set apart from the rest are in the processing. I am by no means an expert. In fact, quite the opposite. As I said, I just started this a few months ago, but I am hoping to continue to improve and share some techniques I am learning along the way.

M42, the Orion Nebula, is a fairly bright object in the sky. In fact, even just looking at Orion's belt with the naked eye you can see the fuzziness caused by this nebula. There are alot of subtleties in the nebula, both with bright and dark nebulosity that are brought out with longer subexposures and processing. I am limited to an alt-az mount right now, so my exposures are 30 seconds at the most. So, I thought I would do a comparison of a few different types of processing of my latest data of M42.

The general data for this shot is as follows:
Taken with Meade DSI II Pro camera (monochrome) taking L,R,G,B channels
Orion EON 80ED scope piggybacked on my CPC 800 XLT
30 sec subexposures: 120xL, 40xR, 40xG, 40xB, total of 2 hours of data
I stacked the subs into channel files using Nebulosity

The three different types of processing I am going to describe and show the results from are:
1) Carboni's Astro Tools
-using ONLY the Photoshop Astrotools plugin (except for 1 rendition of levels to balance background and set the gamma level). This includes creating the RGB and processing

2) Photoshop processing of stacked, unprocessed LRGB channel files (ie stack the files first into an LRGB image THEN process it).
-I used Nebulosity to stack into an LRGB file and threw everything, including some of the AstroTools at it

3) Photoshop processing individual files first, then combining into LRGB, minimal additional processing
-stretched and processed L,R,G,B channel files, then combined using photoshop and added a few more steps to that outcome

Here are the steps for each type of processing I took, and its result.
1) Carboni's AstroTools
-Construct RGB image from Channel Files
-Enhance DSO & Reduce Stars
-Local Contrast Enhancement
-Fade Sharpen to Mostly Lighten
-LEVELS: balanced background color using color sampler, adjusted gamma (middle slider) just to right of histogram
-Enhance DSO & Reduce Stars
-Make Stars Smaller
-Local Contrast Enhancement
-Deep Sky Noise Reduction


2) Photoshop processing of stacked, unprocessed LRGB channel files
-Stack individual channel files in Nebulosity
-Duplicate Image
--Actions (AstroTools): Make Stars Smaller
--Curves (3 iterations)
--Levels - balance background, adjust gamma
--Curves (2 iterations)
--Levels - balance background, adjust gamma
--Curves
--Actions (Astrotools): Local Contrast Enhancement
--Gradient XTerminator plugin (medium-medium)
-Original Image
--Image->Apply Image (apply copy): Overlay - 50%
--Image->Apply Image (apply copy): Add - 50%
--Image->Apply Image (apply copy): Lighten - 50%
-Increase Saturation 25%


3) Photoshop processing individual channel files and combine in PS
-Open all individual channel files (L,R,G,B)
For each channel:
--Levels - adjust gamma slider just to right of histogram
--Curves (2-3 iterations)
-Add RGB channel files to blank rgb image
-Paste L as new layer, blending: Luminosity
-Levels - balance background using color sampler
-Curves (2 iterations)
-Actions (AstroTools): Local Contrast Enhancement
-Curves
-Layer Mask of unprocessed stack onto above process (Opacity - 53%)
-Actions (AstroTools): Make Stars Smaller


Unprocessed Nebulosity Stack (LRGB):


Side-by-side Comparison:


Conclusion:
From these 3 types of processing (I know there are many more), while all 3 work and do show some nebulosity detail, in my opinion, processing individual channel files prior to stacking resulted in more detail in nebulosity and better color than processing the collective stack or just using Carboni's AstroTools.

Saturday, November 14, 2009

A Balancing Act

I knew it would be inevitable - I would have to get a counterweight system at some point to balance the CPC. Yes, it is perfectly balanced when you get it from the factory, assuming you keep with the 1.25" eyepieces (EPs) and you add nothing else onto it. Eventually, almost everyone who gets into the hobby semi-seriously adds on, so enter the counterweights.

I kept reading how difficult it was going to be, esp if I piggybacked a semi-heavy (80mm or larger) scope on top of my CPC. This made me nervous. The Meade DSI II Pro I have (with filter wheel and Outback Razor cooler) added weight to make it tail-heavy already, but conveniently enough, the aluminum Astrozap dew shield countered this perfectly so no weights were needed. However, if I piggybacked my Nikon D40 on top or thought about a piggyback scope I needed a counterweight set as what I had wasnt cutting it - so I ordered Starizona's counterweight set. Initially I just ordered the bottom rail with one weight, but they sent me just the top weight instead. A phone call later they had the right parts sent out and I had decided just to go ahead and keep the top weights - I heard they helped with dynamic balancing anyways.

A week later, I got an Orion EON 80ED scope to piggyback for widefield imaging. I do use my Nikon D40 on an AstroTrac TT320 for very widefields, but I am still having light pollution issues with that and I was only able to go up to 200mm leaving quite a gap between that and my main scope, which with the focal reducer it only went down to 1280mm and was normally at 2032mm. Now I needed to balance.

I only had the one 2.5lb weight that came with the set which was not enough to balance the CPC with the EON piggybacked and I did not want to pay $50/weight for more 2.5 lb weights. I decided to go with 2.5lb gym weights, which cost all of $2.13 each. I also had a 1.5lb weight from my old Meade refractor that I was able to use. I horizontally balanced the scope first, which required moving the weight bar as far back as I could on the dovetail rail and adding 2x2.5lb gym weights, the 2.5lb weight that came with it and the 1.5lb Meade weight. I stacked them so that the weight that came with the set screwed on the bottom to hold the gym weights up and the Meade on top tight against the gym weights to keep them from moving when the scope changed angles.

I then went to balance the scope vertically. It wasnt too far off, I had to lower the weights as far as I could on the screw-in bar and add the small top weight from the Starizona set to the CPC. I went back to double check the horizontal and thankfully it was still balanced as well! This was alot easier than I was told it was going to be and saved me coming up with some creative solutions for balance. The EON does sit pretty far back on the scope so I have to watch my head when looking through the CPC's EP if I have my DSI II Pro attached to the EON, but not too hard to avoid conking myself I would imagine.

So there you go, 9lb of bottom weight, 1.5lb of top weight (as well as the dew shield) a little red fingernail polish to mark the spot the weight bar needs to go to for future set up and we have a balanced scope. Assuming the clouds stay away I will have the setup out tonight and hopefully, now that it is balanced, the GoTo and tracking will be alot more precise than it was with the unbalanced attempt I made last night.

Friday, November 13, 2009

Astrophotography on an alt-az mount with a stock camera

We bought our Celestron CPC800 XLT in late August, mainly intending visual use but I did have the hopes of taking a few astrophotos with it as well else we would have opted for a much lower end scope. If you are familiar with the CPC range they are dual-forked on an alt-az mount. I expressed my interest and some simple questions about astrophotos to our favorite astronomy forum and was basically told that with the alt-az setup that deep space photography was near-impossible as you just cant get the exposure length needed to show the objects. Well, I dont like being told something is not possible so I set out with the equipment I had at the time to see just what I could do. This equipment consisted of the new scope, my Nikon D40, and a t-ring/t-adapter to mount the D40 to the scope. I started with some moon shots and Jupiter just to get familiar with processing basic astrophotos and quickly learned there was a huge curve when it came to astrophotographic processing and it was nothing like the processing I had done on photographs to date. From there I started with a few brighter star clusters and some bright nebula, namely M17 "Swan Nebula"


I was quite pleased that my first attempt at M17 did indeed show the object though went to prove just how far I had to go with my processing skills. I retook and reprocessed M17 over the first few weeks.


For first attempts I was quite pleased. I moved on to other objects over the next few weeks and found that despite what I was told, i could indeed get some passable shots of nebula and some galaxies. This encouraged me greatly and I kept at it, taking the scope and camera out every clear night I could and not only looking visually but as the evening went on hooking up the camera and shooting the cosmos.
I occasionally went back to M17 to see what improvement I could get. On occasion I would stack my new data with the previous weeks' data to see what difference more subexposures would provide and proved to myself that yes, more subexposures (subs) does help. On the alt-az mount I was limited most nights to 30 sec or less subs but by taking 50-60 I was coming up with better and better results. 


I went away from M17 for a while, as it had been a month or two since we got the scope new objects were rising at reasonable times to image so I began shooting them. I also was able to pick up a Meade DSI II Pro astrocam for a great price used and spent a few weeks away from the Nikon just using the Meade and shooting LRGB shots as well as Ha when the Moon was bright. The DSI II Pro has a small chip so a lot narrower field of view (FOV) so I was concentrating on alot smaller objects or just portions of larger nebula, but was still getting decent results, especially from the Ha, on nebulas that I was told that could not be imaged in 30s subs. 


I went back and reprocessed my earlier shots and was amazed by the difference just a few months of processing practice had done. So,  a few nights ago I decided to pop the Nikon back on for some comparison shots of M17 to see how I had progressed. To be fair, I shot with the same ISO setting (ISO 800) as I had before. I took more subs than before (120 vs the 50-60 I had before),  and was quite happy with the outcome. I also took this new stack of 120 x 30s subs and stacked it with the data from the past few months making a combined stack of about 320 x 30s subs. The latest shot and the combined stack are the last two shown.


Conclusions:  Yes, it is possible to image nebulas with alt-az with a stock camera in a border-line red zone (I am located right near San Antonio). A lot of practice both with the images (getting a crisp focus, timing the exposures to not get field rotation, etc) and processing (reading, practicing on others’ data, redoing old data, more practice) has shown this to me. I have even been able to image the Horsehead Nebula, which I was told was not going to be possible on an alt-az and not unless I was in a dark site could I image it. . . WRONG! Its not magazine quality, but its there, and half-way decent. Yes, a wedge to polar align the scope will help my imaging greatly (and is next on the list to get when I want to buy more equipment), but it is possible without one. Some fainter emission nebulas and nebulas that are more spread out might be beyond the reaches of this setup, but I am imaging a lot and enjoying every bit of it!


Tuesday, November 10, 2009

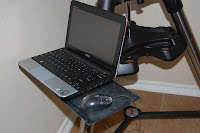
Building a laptop shelf on the CPC tripod

Once I started using a laptop (specifically a Dell Inspiron Mini Netbook), I realized that I would need some form of stand for it near the scope. I had been using a large camping table, but with slew changes I found I had to keep moving the table to keep cords in alignment to avoid them being pulled out. A few nights of this was enough for me to come up with a new solution: building a platform on the tripod leg for my laptop.


What I used:
 -1 x 12" x 7" piece of aluminum flashing (to extend for mouse area)
-1 x 5.5" x 7" piece of aluminum w/holes (used to hold boards)
-1 x large stiff door hinge
-1 x LS30 45º angle "Strong-Tie"
-1 x U-shaped metal fence post bracket (size to go around a tripod leg)
-1 x 2" bungee cord (used for extra stability)
-Velcro  strips
-6 x nuts/bolts thin enough to go through holes of holed-aluminum
-(optional): Black Spray paint, sandpaper, Dremel cutter to trim off ends of bolts

How its done:
1) Place the U-shaped post bracket around the tripod leg, Put ends through both the Strong-Tie and the door hinge (with Strong-Tie underneath the door hinge). Attach the nuts that come with the bracket and tighten.

2) If you are using the extra aluminum flashing (as I did) for a mouse area, place this underneath the holed-aluminum. Make sure both are on top of both the Strong-Tie and Door hinge as those are what hold up this part. Bolt through both pieces of aluminum and onto the door hinge (DO NOT bolt onto the Strong Tie if you want to be able to raise the stand as I show in one of the pic)

3) After these are fastened securely hand move the Strong Tie to an angle that will allow the laptop to sit level (mine is not quite 90º) and support the above aluminum table.

4) Use the bungee cord to loop around the top of the tripod leg and into the top holes of the door hinge for added stability (additional option is getting a smaller post bracket for these holes)

5) I then spray-painted everything black (though I would suggest to do this before you start, used a Dremel cutter to cut all the bolts flush to their nuts and then sanded the mouse portion (as I have a laser mouse the flat black was absorbing too much light and the mouse wasnt working. I also have Velcro squares on the bottom on the laptop and top of the holed aluminum for a little more stability for the laptop and I used Velcro to mount my USB hub below the new stand onto the leg.


Monitor Calibration

Monitor Calibration
The grayscale above presents 24 shades of gray from pure white to solid black. If you cannot see all 24, your monitor needs calibration to view the astrophotos correctly: I recommend the site linked in the image