My website now has the capability to host the blog. As such, I have imported all the posts currently on this blog and will be posting future blog posts there instead of here.
To access the blog, please go to: http://www.eprisephoto.com/blog
If you are here searching for "Annie's Astro Actions", they can be found and ordered at the website, as well. This link is: http://www.eprisephoto.com/astro-actions
If you have any questions or comments, you may contact me at: antimorris@me.com
Thank you for visiting!
Monday, January 27, 2014
Friday, December 6, 2013
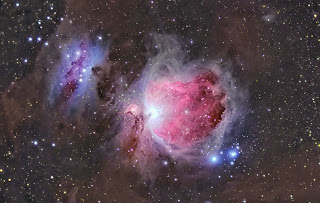
Step by Step processing of the Orion Nebula
I have gotten several requests as to how I processed my latest M42. Before I go into that I want to mention that my processing of this was done using Adobe Photoshop CS5 and includes a few different processes layered together. This is snowballed a little by M42 and its high dynamic range from the core to the outer dust, which adds layering to avoid blowing out the core.
I will include photos as I go so you can see how the steps progress. I started with several stacks as I took multiple exposure lengths. I took 5 different sets and ended up making 2 master stacks: one for the core with the 60s and 120s exposures, one with the 480s, 600s, and the 900s exposures for the rest. I would normally use each set as its own process and layer the 5 together but started with the two to try to save time and it turned out well so didn't go back and do the individual stack processes.
Here are the two master stacks:
 I started with a process of the core stack. I didn't focus on stretching it too much as I was just going for the detail in the core as the other stack would cover all the rest of the detail. A few levels, curves, and the enhance dust lanes action from my set and here is the final core stretch:
 I saved this and then pulled up the long exposure stack and for the first run-through on it I removed the stars (action in the set) and some additional fine tuning using the clone tool for the brighter stars resulting in a starless main stack. I also ran GradientXTerminator for the image as I had a little bit of gradient showing from shooting in the south where there is a town about 15 miles away:
 From here I ran the Channel Process action followed by a couple small manual rounds of curves, as well as the dust & scratches filter to take care of a few of the star remnants that pop up when you stretch which left me here:
 I opened up the Color Efex Pro plugin and used the Detail Extractor as well as the Color Contrast Range selections which brought out a good bit of the dust. I did a little additional touchup with Dust & Scratches and the clone tool for the star remnants again (especially for the two larger stars just at the bottom on M42):
 The colors were beginning to get a bit muted so I did some selective color boosting to bring out the reds that had gotten dulled down when I balanced the background with GradientXTerminator:
 I ran my Enhance Dust lanes action and then pulled the image back into Color Efex Pro and did a mild Detail Extractor along with Tonal Contast and Pro Contrast:
 Now I opened the original stack and began processing with the Channel Process action and the GradientXTerminator plugin (basically started the processing the same way I did with the starless version):
 I ran Enhance Dust Lanes and some selective color boosting via Match Color (Image>Adjustments). To do this I used the lasso tool, feathered, on the two nebulas individually so I could customize each one a little better. After this I ran the Reduce Star Size action followed by Boost Star Colors. I then did a small amount of curves:
 Now I brought the starless processing up and made it a layer on top of the starred semi-process and set the blending mode to lighten to bring through the stretched dust of the starless version and the stretched stars of the lower layer. I pulled up the lens correction filter and used it to counter some of the coma I had from forgetting to use my field flattener. I cropped as well just a small bit to focus the attention more on the nebula and the immediate surrounding dust:
 I did a little more color boosting with Match Color and the Brighten Color & Sharpen action and used some layered contrasting on the dust. This helped to make the browns in the dust pop compared to the background and the colors and details in the nebula to show up a bit better:
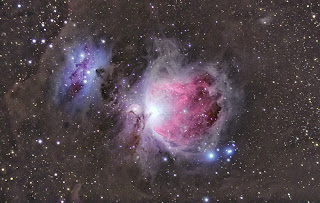
 Now I opened up the core processing and layered it into the core section of M42 (using this method) to show the detail of the core in the parts that got blown out in the longer exposure stretching. I toned down the blue a little around M43 as well since the previous color boost had made it a bit more of a focus than M42. Finally I ran the star color boosting action and ran Noise Ninja on the image to produce the final image:

I will include photos as I go so you can see how the steps progress. I started with several stacks as I took multiple exposure lengths. I took 5 different sets and ended up making 2 master stacks: one for the core with the 60s and 120s exposures, one with the 480s, 600s, and the 900s exposures for the rest. I would normally use each set as its own process and layer the 5 together but started with the two to try to save time and it turned out well so didn't go back and do the individual stack processes.
Here are the two master stacks:
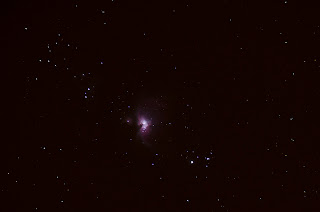 |
| Core Stack |
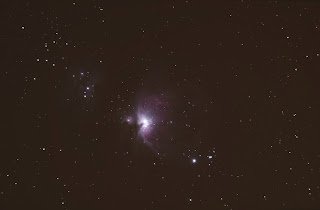 |
| Long Exposure Stack |
I saved this and then pulled up the long exposure stack and for the first run-through on it I removed the stars (action in the set) and some additional fine tuning using the clone tool for the brighter stars resulting in a starless main stack. I also ran GradientXTerminator for the image as I had a little bit of gradient showing from shooting in the south where there is a town about 15 miles away:From here I ran the Channel Process action followed by a couple small manual rounds of curves, as well as the dust & scratches filter to take care of a few of the star remnants that pop up when you stretch which left me here:I opened up the Color Efex Pro plugin and used the Detail Extractor as well as the Color Contrast Range selections which brought out a good bit of the dust. I did a little additional touchup with Dust & Scratches and the clone tool for the star remnants again (especially for the two larger stars just at the bottom on M42): The colors were beginning to get a bit muted so I did some selective color boosting to bring out the reds that had gotten dulled down when I balanced the background with GradientXTerminator:I ran my Enhance Dust lanes action and then pulled the image back into Color Efex Pro and did a mild Detail Extractor along with Tonal Contast and Pro Contrast: Now I opened the original stack and began processing with the Channel Process action and the GradientXTerminator plugin (basically started the processing the same way I did with the starless version):I ran Enhance Dust Lanes and some selective color boosting via Match Color (Image>Adjustments). To do this I used the lasso tool, feathered, on the two nebulas individually so I could customize each one a little better. After this I ran the Reduce Star Size action followed by Boost Star Colors. I then did a small amount of curves:Now I brought the starless processing up and made it a layer on top of the starred semi-process and set the blending mode to lighten to bring through the stretched dust of the starless version and the stretched stars of the lower layer. I pulled up the lens correction filter and used it to counter some of the coma I had from forgetting to use my field flattener. I cropped as well just a small bit to focus the attention more on the nebula and the immediate surrounding dust: I did a little more color boosting with Match Color and the Brighten Color & Sharpen action and used some layered contrasting on the dust. This helped to make the browns in the dust pop compared to the background and the colors and details in the nebula to show up a bit better:Now I opened up the core processing and layered it into the core section of M42 (using this method) to show the detail of the core in the parts that got blown out in the longer exposure stretching. I toned down the blue a little around M43 as well since the previous color boost had made it a bit more of a focus than M42. Finally I ran the star color boosting action and ran Noise Ninja on the image to produce the final image:
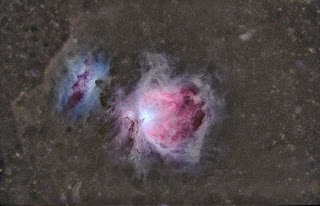
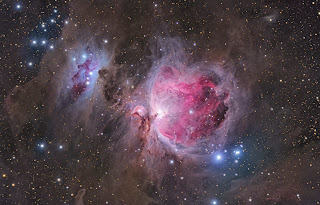
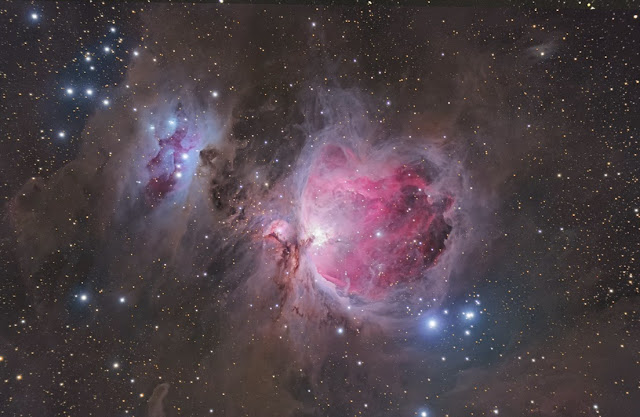
Here is a larger version of the final image:
Thursday, December 5, 2013
Bringing out the dust
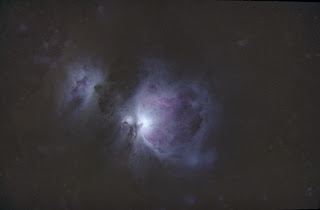
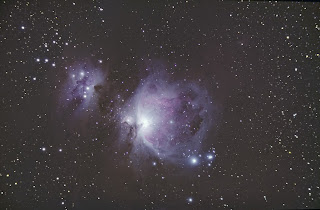
I finally got a chance to shoot the Orion Nebula for the first time since I started imaging. After months and months of clouds and full moons during the only clear evenings I got a perfect evening. By far the best skies I have had here at the house since we moved here 3 years ago. I have had the scope set for Comet ISON (which didn't make its trip around the sun) so instead of putting my regular configuration back on, I decided to use my Nikon D7000 to shoot M42. I did a variety of sub-exposure times to compensate for the high range of lighting in this region so have subs ranging from 60 seconds to 15 minutes with a total of 8 hours. Instead of going into how I layered all of those to get the detail from core to dust I want to show just how much dust really was captured.
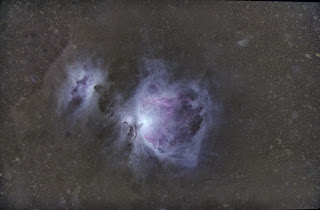
I started off using my normal processing steps (i.e. stack, run through my Photoshop Action set, color correct, some manual stretching, possibly GradientXTerminator, a few other actions, noise reduction) I did these and then used a plugin I have and occasionally use for my normal photography business called Color Efex Pro. There are a few of the steps in there I have found useful for certain astrophotography targets so gave them a try. Using Detail Extractor, Tonal Contrast, and Pro Contrast I was able to tweak out a bit more of the dust and get a nice looking final image (you can see higher res on my website).

I started off using my normal processing steps (i.e. stack, run through my Photoshop Action set, color correct, some manual stretching, possibly GradientXTerminator, a few other actions, noise reduction) I did these and then used a plugin I have and occasionally use for my normal photography business called Color Efex Pro. There are a few of the steps in there I have found useful for certain astrophotography targets so gave them a try. Using Detail Extractor, Tonal Contrast, and Pro Contrast I was able to tweak out a bit more of the dust and get a nice looking final image (you can see higher res on my website).
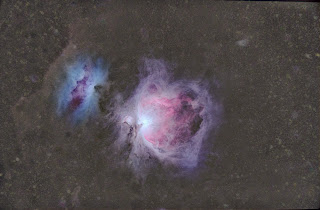
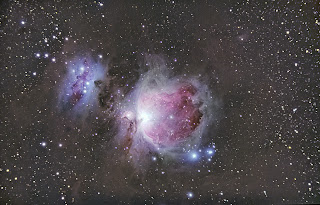
Now is when I started to play some more. I could tell there was more dust to be tweaked out, but was getting to the manageable limit of noise for a final image, but that doesn't mean I couldn't play just to see what was there! I did a few more curves and then brought the image over to my Windows PC where I have another one of the Nik Software suite, HDR Efex Pro. I ran it through there just to see how much of the range I could pull out and was amazed. Obviously the noise overran the image, but the amount of dust in this area was phenomenal. Especially as I had always assumed one needed 15+ hours on it to pull that kind of dust out (and probably would to do that and not have the noise at full size).

Even in this small size, you can start to see all the noise but the dust still looks quite impressive. Amazing what an unmodified DSLR camera, modest telescope, mostly dark skies, and 8 hours of exposure can show that you just can't see when looking up at night!
*note: I do not get anything from the external companies or plugins I mentioned above. I just include them and the links to explain to other astrophotographers what tools I used and help them find them easily if they wanted to check them out. I am not intending on promoting them, more just to be thorough in my processing explanations.
Sunday, August 18, 2013
A full week of astrophotography in the Haute-Alpes, France
I just spent a week down at Olly Penrice's astronomy mecca in Southern France. Crazy me drove down with all of my gear (the whole trip both ways and what driving we did during the day down there totaled 2100 miles!) and much to Olly's amusement set up my "portable" kit on his pad, desktop computer and all.

It was an absolutely gorgeous week and I got somewhere around 46.5 hrs of data total on 5 separate targets plus a few Milky Way shots with my DSLR on a tripod as I sat and watched the meteor shower and enjoyed the clear summer evenings. I do have some meteor widefields I have yet to stack and process as well as some more Milky Way shots, but here is the one I have done that I like the most.


I started on vdb126 as I love dark nebula regions and rarely image them. I did this for part of the first night and then moved on. It needed (and still does) some more data, but I had other priorities for most of the imaging time and just wanted something to show for this region.

Over the next 6 nights I worked on the remaining targets depending on where they were along the southern horizon, the slowly increasing moon, and how much data I had gotten on them yet. Here are the images I got over the week. I have a little more integrating and work to do on a few of them, but they are mostly processed.
Helix Nebula (LHaRGB):

Cocoon Nebula (LHaRGB):

Trifid Nebula (LRGB):

NGC 6559 (LRGB):

All were taken with my Orion EON80ED scope, Atik 314L+ camera, and Astronomik Filters while being piggybacked on my CPC800XLT on a wedge. More integration time details are available on my website although some of the time on the Helix I have stacked with a few other subs I got at a star party a while back which added to the 46.5 hour total from this week by 4 hrs making 50.5hrs for these 5 images. Could not have been a more perfect astrophotography week by my standards and it was nice to get the scope out and running again as it has just been collecting dust for the past 5 months or so as other things have taken priority. Well worth the year it took to book, plan, and actually get down to these amazing dark skies for a whole week of nothing but astrophotography by night and touring around the wonderful little towns in the area, hiking, and shopping during the day!
Friday, April 13, 2012
Blogging fell by the wayside
I have been incredibly busy since Christmas and unfortunately forgot to make any posts as a result. I have done some astrophotography and enjoyed the few clear nights England provided. Here are a few of the objects I imaged over the last few months:
vdb14 was a bit of a challenge for me. It is a faint bit of nebulosity in the constellation Camelopardalis. You don't see many images of it so I wasn't quite sure the orientation the camera should be in initially but that was sorted after one sub. The main problem is my scope/image train does not necessarily like broadband emissions, and in particular the blue wavelength. I get bloated stars on all blue and Luminance frames which make processing especially difficult. This is the reason I tend to stick to narrowband images for the time being. Despite these issues, I was thrilled with how it turned out.
The all-too-familiar Horsehead Nebula. I hadn't imaged this since I first began astrophotography and thought it about time I hit it again. I wanted to get the depth and detail that Hydrogen-alpha provided but also not lose the blue reflection nebaul below the HH. As always in this region, keeping Alnitak (off frame to left) from ruining the photo is always a fun challenge. I think I managed to succeed fairly well with this final result.
I also decided I wanted to try out a few more planetary nebulas. I only got one managed with out few clear nights but it provided enough of a challenge. I shot it in narrowband so have no star colors, something which I would like to eventually remedy, but the depth and detail of the Owl Nebula itself made me happy. This is an easy nebula to have washed out and not get any of the inner detail/stars. It was a processing challenge to keep that and bring out the rarely seen outer OIII halo, but I am always up for a challenge (even if I do not always succeed). Here was the final result, although I do wish to revisit this in RGB to add some star colors and perhaps better nebula color as well.
vdb14 was a bit of a challenge for me. It is a faint bit of nebulosity in the constellation Camelopardalis. You don't see many images of it so I wasn't quite sure the orientation the camera should be in initially but that was sorted after one sub. The main problem is my scope/image train does not necessarily like broadband emissions, and in particular the blue wavelength. I get bloated stars on all blue and Luminance frames which make processing especially difficult. This is the reason I tend to stick to narrowband images for the time being. Despite these issues, I was thrilled with how it turned out.
 |
| vdb14 |
The all-too-familiar Horsehead Nebula. I hadn't imaged this since I first began astrophotography and thought it about time I hit it again. I wanted to get the depth and detail that Hydrogen-alpha provided but also not lose the blue reflection nebaul below the HH. As always in this region, keeping Alnitak (off frame to left) from ruining the photo is always a fun challenge. I think I managed to succeed fairly well with this final result.
 |
| Horsehead Nebula |
 |
| M97 - Owl Nebula |
I don't do many galaxies, mainly due to the blue bloat I mentioned earlier but am trying to expand my repertoire and so had a crack at M106 in RGB. A slew of new processing techniques and new "beta" actions I created helped me out with this one and although I had to do alot of work to keep the color manageable (esp in the blue wavelength) I think it paid off:
 |
| M106 |
And now to end on something in our solar system. I got a Philips SPC900NC webcam and a Televue 3x barlow to start to learn planetary imaging. Man, its tricky! I did manage to finally get Mars looking like Mars and will call that a successful planetary attempt even though it isn't the greatest and is still very grainy. Hopefully I will have more and will probably have a whole blog on planetary imaging at some point.
 |
| Mars - 29 Mar 2012 |
For the British winter, I did manage a decent amount of astrophotos among everything else I was doing, to check out more see my website at http://www.eprisephoto.com/astrophotography.
Hopefully will have a proper blog post soon!
Subscribe to:
Posts (Atom)
Monitor Calibration

The grayscale above presents 24 shades of gray from pure white to solid black. If you cannot see all 24, your monitor needs calibration to view the astrophotos correctly: I recommend the site linked in the image