About the Blog

This blog contains recent projects, activities, and musings about astrophotography and space, to view my main webpage with prints for sale, final images, and Annie's Astro Actions, please visit: www.eprisephoto.com

.

Friday, February 26, 2010

My first polar alignment attempt

So my first attempt at polar alignment and working with the wedge were about what I expected, meaning not that great but at least I learned alot. Though at least with the clouds and the moon I didnt feel like I was wasting a great observing night. Here's how it went: 

Got it all set up this afternoon and roughly oriented to celestial north (we had previously marked paving stones in the yard that we use for the tripod legs with the directions for celestial navigation) and waiting til dusk. About then I realized I hadnt balanced the scope on the wedge .... um yeah - that went fantastically (sarcastic of course) ... when I balanced on alt-az once I had the piggyback scope it didnt take too long to get a dynamic balance, not the case on the wedge so #1 thing to add to the "do in the daytime" list. I got it close and about that time the stars were becoming visible. 

I started to align the wedge and scope with my polar scope (the arm I made isnt SUPER sturdy (just sheet metal) - so this was just to get me roughly close) ... got close there and got closer using eyepieces. Then I ran through the Celestron Equatorial Alignment sequence (as that is what my manual says to do after you have a close polar alignment). Did that no problems. Then my manual says to do a "wedge align" - only problem is there is no wedge align in the menu .... had to come inside to read that my upgraded firmware replaced that with something else. Check - back out to the scope ..... 

At this point I wanted to see how well I was doing so I put in my Ha filter and slewed to the Horsehead Nebula -- spot on center so yay the alignment mustve been pretty close. I set it for a 60sec image just to gauge how close to a polar alignment I was .... only slight star trails so semi-encouraging. At this point I decided that perhaps I didnt run through the new sequence quite right so I powered down and ran through it all again, this time I added in the "Polar Align" after the "Eq Align" as the new firmware recommends. Slightly off for the polar align sequence so readjusted the mount in that step and then went back to HH to try again ... not center anymore - in fact it was JUST barely in the screen - AW SNAP - mustve not had as great alignment this second go-around ... tried another 60sec image - slightly worse than the first run-through ... GRRR!!! Reassessed and realized I hadnt done the "Polar Align" right. My feet were frozen by this point (note to self - dont wear sandals out on tomorrow's try) so I came in to watch tv and warm up with two giant Great Pyrenees as feet and lap warmers. 

I just went out and put the scope to bed for the night with the following lessons learned: 
1) balance the scope in the daytime ... (and sand that metal bur off the bottom of the counterweight set - I sliced my hand open twice on it tonight)
2) work on the cord situation .... not as much as a problem on alt-az but this extra angle makes the cords quite a mess - fix that in the daytime too
3) reposition polar scope arm ... where I have it gets me close but not close enough ... perhaps move it to the center and just use it before I put the scope on the wedge
4) Dont let the scope auto-pick the alignment stars, at one point i was half-upside down balancing off the fence to get my head where I could see through the finder and eyepiece .... I am not acrobatic so was not very fun
5) be super accurate when aligning so its less error that needs to be corrected in the "polar align" step. 

I didnt expect to get it down pat the first try and be off and imaging 5-10 min subs without an autoguider just on my superb polar alignment skills an hour after attempting it, but got at about 60s subs without really knowing what I was doing so all in all a fairly successful night. I am planning another attempt tomorrow, and if it goes well might get the PEC training for the scope in as well and attempt some autoguiding (my guide camera should be in tomorrow ... though that would mean balancing my piggyback as well - hmmmm come to think of it perhaps that should wait a few more days until this polar alignment thing is slightly easier for me). 

Ok I am done rambling for tonight! 

Saturday, February 20, 2010

Annie's Astro Actions have a new home!

I finally have our proper website up and running (although there are a few pages that are still being populated). Annie's Astro Actions will now be sold from there and my blog will go back to more blog-like content related to astronomy and scope modifications. I will still have an order place on the right, but no more descriptions etc, I will just have a link to the new site.

The new location of Annie's Astro Actions is: http://www.eprisephoto.com/astro-actions

Enterprise Photography and Astronomy is our new site (located at http://www.eprisephoto.com) and has not only the actions, but other photography for sale. Feel free to browse around and send us any comments you have!

Wednesday, February 17, 2010

Annie's Astro Actions Version 2.0 Released!

I have just completed some updates and addition of several new actions to Annie's Astro Actions. Version 2.0 has officially been released and sent out to all those who ordered Version 1.0. New actions include:

  • Create Watermark: Creates a watermark across your image to protect your images against copyright infringement
  • Reduce Vignetting Method #1: One of two methods I am providing that will help reduce vignetting in your image (needed if you dont take flats) ... try both methods to determine which will work best for your image
  • Reduce Vignetting Method #2: Second method for reducing vignetting. This one requires less user interaction
  • Gradient Remove Method #1: One of two methods I am providing that will help to remove gradients in your image and balance your background color ... try both methods to determine which will work best for your image
  • Gradient Remove Method #2: Second method for reducing vignetting. This one requires less user interaction
  • Reduce Star Bloating: Reduces star bloating that can occur when stretching your image


I will get some before/after shots of the new actions up soon. There are a few other updates and things changed in the action set (all changes described in the "Instruction" file that comes with the download. 


The entire list of Actions set is (with the new ones in blue):


Dew Heater Controller in Fork-Arm Modification for CPC

I have been wanting to get active dew control for a while, especially after multiple nights with a dripping scope and having to use my blow dryer to clear the corrector plate so I could continue imaging. I saw on the Cloudy Nights Forum a while back that someone had put their dew controller into their fork arm and thought this was a great idea, it would cut down on wires and things velcro-ed to the scope in the field. I finally got in my Dew-Not dew controller and after ensuring it worked I decided to go about performing the modification.

First, a trip to Radio Shack! Here are the parts I had to get:
-Size M coaxial DC power plug (part #274-1569)
-Size M coaxial DC panel mount power jack (part #274-1563)
-4 RCA jacks
-4 Shielded phono jacks (panel mount) (part #274-0346)

You will also need a Dew-Not dew controller, a solder gun and solder as well as a set of alan wrenches and a small flat-head & phillips screw driver. A Dremel sanding tool (or sand paper), and a Drill. Small wooden or plastic dowels are helpful to keep the circuit panel in place but not a necessity.

Next you need to disassemble your Dew-Not controller and take out the circuit board, use your small flat-head screwdriver to take off the adjustor knobs - keep them handy for later :


Now take off the panel for your fork arm with the handle with the Alan-wrench set. There are two screws on the handle and four on the inside corners of the fork-arm. The cover will come off easily. 

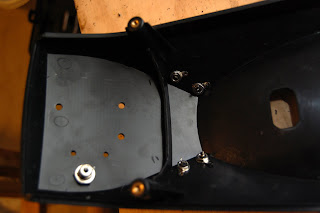
Next you will need to drill the appropriate holes in the fork arm cover. Use the circuit board to determine exactly where. You will need 2 for the temperature knobs and 3 for the lights. Don't make them too big else it will allow movement in the board which could pull wires loose.  After you have the circuit board able to fit in the cover you can determine where to drill the holes for the power plug and the RCA jacks. I found with the circuit board, space was tight so the RCA jacks are on the sides rather than the front face, and my power jack is to the right of the temperature knobs. Once you decide where, drill those holes and attach the appropriate jacks. 


Next I decided to cut the wooden dowels to help keep the circuit board stable on the left side (looking from the inside) ... the right side will be held by the temp. knobs. I put the circuit board in and decided how long to cut them then used the small silver circuit board screws that were used in the Dew-Not box to put the dowels on the board. At the same time I used the Dremel sanding tool to sand the ridge down on the cover so that the RCA jacks wouldnt raise up the circuit board. 

(the wooden dowels are on the bottom edge)


Now its time to solder! Put the circuit board in place and affix the temp. knobs so it will hold in place and then solder on your RCA wires and your power wires.


Before you attach it back to the scope, test it out. I used my Starizona power pack to make sure it worked as I havent attached the Size M coaxial power plug to the wire yet. Once you are sure all the connections work, attach your fork-arm cover back to the scope and you are done!!!

For the power plug, just solder on the wires onto the Size M coaxial power plug and you are done. I found the included power wire was a bit short so I am going to run back to RS and get a longer wire for the power to avoid cord wrap, but other than that, my Dew-Heater Fork-Arm mod is complete!!! Hey, if I can do it all by myself without ever having soldered anything before, anyone can!!!

Tuesday, February 16, 2010

Finally the clouds clear

After endless rain and clouds for weeks, we have finally gotten some nice evenings. I was able to get to a semi-dark spot but still within a reasonable driving distance this past weekend and did a little imaging while socializing with the other astronomers there. Its not super dark, but better than my back yard. I am still waiting on my new ccd so I just hooked up my Nikon D40 to my CPC 800 and had a go at NGC 2403.

For 30 sec subs I was pretty happy with it. I still get alot of color blotching from the chip in my D40, but once I can get over the frustration of that I got to processing my stack of 249 subs. a heavy hand on the saturation allowed me to pull out some decent color from the arms, but nothing like I would get if I were on an equatorial mount. Same with the detail in the galaxy's arms, but all in all, not a bad result.


I am looking forward to my new camera getting in and getting back out to some more serious imaging. I have plenty of time to learn the new camera before our trip to Big Bend where I will finally get some seriously dark skies for the first time since our Yosemite trip. 

Friday, February 12, 2010

Updates . . .

nothing but clouds and rain here still, and thanks to the NE "snowmageddon" my new ATIK camera hasnt been shipped to me since they are snowed out of their building . . . sigh . . .

The good news is that I have finally had the chance to play with the action set some more. There are a few minor updates as well as two new actions to add to the next release (hopefully I will have more than that soon).

I am also working on a proper website for not only the actions, but my other photography, etc. . . more on that later.

If you have any ideas you want to throw my way for actions for the update let me know! I am always open to suggestions.

Monday, February 8, 2010

Orion Nebula Mosaic completion

This was a month's worth of work thanks to clouds. Ended up being a 5 panel mosaic of M42 and my final image with my Meade DSI II Pro (it is getting traded in for a better CCD)

Each panel is roughly 340 x 30sec images (80xL, 60xR,G,B) for a collective total of just over 14 hours of data in 30 sec. snippets. Each channel stacked in Nebulosity then brought over to Photoshop where I used "Annie's Astro Actions" to process it (used the "Channel Process", "Make DSO Stand Out", and "Create Mosaic - 6 panel" , other than that I just used some slight levels to balance the colors between panels.

There are areas that could stand more data (top right and bottom left), but thanks to weeks of clouds with only a day or two of clear in between massive rain storms I ran out of time and my camera sold so this is it.

Overall, I am quite happy with the result, especially considering it was all with 30s subs and I havent been at this all that long.

Wednesday, February 3, 2010

Back to astronomy ... or not

After creating my action set (thanks to a few weeks of clouds) I was hoping to get back out to observing and imaging, but apparently the weatherman didnt agree and I got about 2 nights worth of clear skies before I have had another week of solid clouds and no end in sight. I got about half way done with a mosaic of M42 with my Meade DSI II Pro and Orion EON 80ED I am doing and now that is on hold again pending some more clear skies.

I am still deciding what other processes I do with my photos that I could create actions for so since the astronomy forecast is solid white I think I am going to pull out my hard drive and reprocess some of my earlier images.

If you have any ideas for me - please feel free to shoot me an email or comment to this blog post. I am always open to ideas!!!

Meanwhile - the promotional pricing has ended - the regular price of $12 is now active (includes free updates). I have gotten a few questions if I am going to release a Photoshop Elements version. Right now I am not actively working on one (as I dont have Elements), some of the actions DO work, though not all. The current release of Annie's Astro Actions works with all full versions of Photoshop.

Monitor Calibration

Monitor Calibration
The grayscale above presents 24 shades of gray from pure white to solid black. If you cannot see all 24, your monitor needs calibration to view the astrophotos correctly: I recommend the site linked in the image