About the Blog

This blog contains recent projects, activities, and musings about astrophotography and space, to view my main webpage with prints for sale, final images, and Annie's Astro Actions, please visit: www.eprisephoto.com

.

Wednesday, October 19, 2011

Nikon D7000 for astrophotography: Review

Note: This review can be downloaded as a pdf at: http://www.eprisephoto.com/nikon-d7000.pdf

Although my first astrophotos were taken with a DSLR I quickly steered clear of DSLR astrophotography for a few reasons. First, I use my camera (at the time a Nikon D40) for my regular photography jobs and therefore was not going to get it “astro-modded”. Second, it was beyond noisy. Rather than having a field of stars with a few hot pixels, images were coming out as a field of hot pixels resembling a children’s paint splatter painting with a few stars and perhaps a galaxy thrown in for good measure. Dark frames helped, but even proper calibration only did so much for the overly noisy images. Third, I found a used ccd camera for a good deal and after trying it out once, despite the limited FOV from a small chip, found it much better in terms of image quality and lack of noise. I see fantastic results from DSLRs so I know it can be done, but my few experiences had been nothing more than an exercise in frustration. Fast forward a few years and I found myself upgrading to a Nikon D7000 camera. At the time, I had no thoughts of resuming DSLR astrophotography when I purchased it, but after a few months I decided to give it a go. 
Testing out the D7000: 
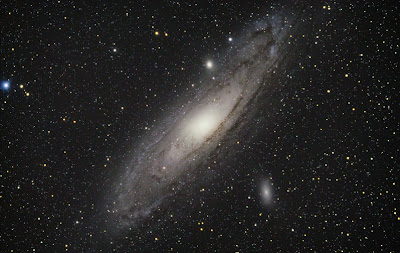
After attaching the D7000 to my scope and setting up the DSLR-USB IR sensor so I could set up a sequence via the computer I set about focusing. The D7000 has “Live View” which I was going to use for focus but once I switched to it I realized that while I could see the star I wanted to focus on, it was going to be too dim to accurately focus. I was able to get it close but then switched the live view off, put on the Bahtinov mask, and took a 2 second exposure. It was close enough that it only took me a few moments to fine tune the focus and lock the scope. I found the guide lines in the viewfinder when the shutter is pressed (which light up a dim red) very useful for framing my intended target of the night, M31. I set my ccd up as an autoguider and set “DSLR Shutter” (the program I use on the computer to control the IR sensor on the DSLR-USB IR to take a 10 min exposure and ... nothing. No shutter click to let me know the image had begun. I had the menu settings to “Quick Response Remote” but the D7000 has a roll bar underneath the left selector wheel (where you select M for manual, Auto, etc) that you also have to roll over to the remote picture. Once I had done that, I reset “DSLR Shutter” and off it went. 10 minutes later I checked the result and was pleasantly surprised. At ISO400 (I kept the ISO fairly low since the moon was going to be coming up soon and because I was used to a VERY noisy DSLR in the D40) the image was crystal clear. Andromeda looked great as did the stars and color across the whole image. Obviously the preview screen was always bound to look better than the full-sized image but no glaring problems were obvious so I set “DSLR Shutter” to take a set of 12 ten minute subs and let it shoot. I went back out 2 hours later to find that battery hadn’t even drained 1/4 of the way (also a problem I had with series’ with the D40) and I now had 13 subs of M31. I took a few darks for good measure and brought them all in to check out. 
D7000 Settings:
Before I get into the results of the evening I want to give you the settings and menus where I set those for the session. These are the only camera settings I changed, everything else was left to its default and no “in-camera noise reduction” was used. 

Exposure:
M (Manual)
Roll wheel on top left of camera
ISO:
400
Press “ISO” button on left of preview screen, turn roll bar in front of shutter/on-off button
Image Quality:
NEF (RAW)
MENU->Shooting Menu->Image Quality
Shutter trigger:
Quick-Response Remote
Two places: Shooting Menu->Remote control mode->Quick Response Remote, Secondary roll wheel on top left of camera->remote picture
Shutter Speed:
BULB
Right thumb roll bar 
Results:
They say a picture is worth a thousands words, so I will show these results I will start by showing you what a single 10 minute dark sub looked like. All I have done to this was convert it from RAW to a tiff file and then used levels to stretch it so you can see the noise pattern (otherwise it looked completely black at this size).The darks look pretty good to me, especially for a 10 minute sub. Once I combined the 6 I took after my session I had a nice Master Dark to use for calibration. 


Before I did that I did a quick process of an uncalibrated single 10 minute sub of M31 just to get a “before”. This is a crop of the edge of the galaxy. No darks, flats, or bias frames and just a few processing steps comprised of levels and curves. 

I was floored that even a single 10 minute sub with a mild amount of stretching had such little noise! Granted it was a cool evening (40 degrees fahrenheit) but the inherent noise of the D7000 is exponentially lower than the older D40.  The noise was so low in the single stretched sub that I went ahead and did a stack of the uncalibrated subs. Hot pixel streaks were very minimal and in a pinch I believe I could even get away without shooting darks on a cool fall/winter imaging evening. 
I did, however, apply the Master Dark to the subs before I brought them over to be de-Bayered, aligned, and stacked for the final processing. I used several programs to compare how the image looked from the raw stack (Registar, Maxim DL, and Nebulosity), all three came out looking fairly decent but I used the Maxim DL stack for the final process as I found it did a better job on the balance of colors from the Bayer matrix. I used solely Photoshop CS5 for the post-processing, although I do have several plug-ins in addition to my own action set that I use for the processing. I ended up not using any noise reduction in the final process. 
Conclusions: 
For a “first light” for the camera, astrophotography-wise, I would have to say that the D7000 has completely changed my opinion of DSLR astrophotography. Not only does the camera produce crisp, clean images that are relatively noise-free (at least compared to my previous experience with DSLR astrophotography), but the efficient use of the battery allows an evening of shooting without having to worry about the battery going out mid-exposure. As I had this only a fairly low ISO setting (400) I might have to try to shoot some fainter nebulosity with a higher ISO in the future and expand my DSLR astro-gallery. All in all - a great camera in the day or night that I would highly recommend. 


Higher Res final image can be found here: http://www.eprisephoto.com/galaxy/h23732f43

Thursday, October 13, 2011

I need more power Scotty! . . . aka "How to build the AstroPig 140"

I have been increasingly frustrated by my power tanks lately, mainly in that I have to use 2-3 of them just to get a full night of imaging with my scope, ccd, filter wheel, auto guider, and dew heaters all running. This, and the largest one I have was 17Ah and after multiple moves (and consequently being drained of power for months at a time during the move) they do not like to hold a charge anymore. My solution: build a power box.

I have done a full writeup of my requirements, calculations, parts, and the build which can be found in this pdf document: http://www.eprisephoto.com/power-box-project.pdf

In short, I have made a power box with a 140Ah 12v deep cycle battery, 6 cigarette lighter-type power sockets, a 7 port USB hub, and two 120v GFCI outlets which are hooked to a 450W power inverter.

I have red lights that shine to the side and down to help with navigating around the scope without tripping over anything, a red LED voltmeter on the front panel and a Battery Tender charger built in as well.

The most difficult part of the build was planning (as is typical with projects) partly as I had not done any wiring projects in quite a while and wanted to be thorough planning out the wiring and parts to map sure it will be safe, all work, and as inexpensive as possible. I went with Anderson PowerPoles for the wiring and distribution box so I wouldn't have to do any soldering and so it would make it simpler to fuse and exchange parts as necessary. Although using these did increase my costs it made the wiring portion significantly easier and, to me, well worth the extra expense. Other than these I did a lot of shopping around and made good use of eBay and other internet sites to find parts. The battery was one of the few things I had to source locally but managed to get it delivered for free which was very nice as a 140Ah battery is quite heavy.

It took a few weeks to get all the parts in, build the box, and wire everything but it is all together and running. I learned a good bit between all of the planning stages and testing everything as I was wiring it all together but it was very fun and nice to have a home-built power box!

I was told it looks like a squat little pig so it has affectionately been named the "AstroPig 140"

Feel free to download my pdf and read more in-depth about the build.


Sunday, August 21, 2011

Two years and a Pelican

Two years ago I could not even tell you what someone meant if they said "narrowband image" let alone expect that I would, in a relatively short amount of time, learn enough about astrophotography that I would be undergoing a project that would take all summer and result with a total of 3 entire days worth of exposure time for one photo. I have definitely been bitten by the astrophotography bug and although I am doing so on a very limited budget, am endeavoring to make the most of what I have.

On May 20th I started what would be this image. My first full-narrowband multi-panel mosaic began with the Pelican's head of the Pelican Nebula in Hydrogen-alpha. When I started imaging that night, I did not PLAN to be doing this mosaic. I just wanted to image the Pelican Nebula. As the evening went on and the sub-exposures stacked up I began thinking: I wasn't even getting the whole Pelican in this image and with my current setup this is as wide-field as I can get using the ccd camera - why don't I do a mosaic. I went in and began doing the calculations. For the field of view I was considering it would be around 18 panels, give or take, depending on just how far I wanted to extend it. Keep in mind that to do a full-narrowband image that would mean doing this mosaic 3 times over (note: after the Ha was completed I came up with an alternate way to do the SII & OIII - more on that later). On top of this, I am currently living in England. A country not exactly known for clear skies and in the summer there are very few hours of darkness due to the high latitude. Oh well! I might as well make this an extended project and off I went. I declared my intentions on the two astronomy forums I frequent just in case I began to let the enormity of this venture get the better of me they could keep me going. As luck would have it, and much to my surprise, I ended up getting quite a string of clear nights so was able to make relatively quick work of most of the Ha layer. Then things stalled for a while, mainly due to lots and lots of rain and clouds. It took me from May until August to finish up the Ha layer, which ended up being 18 panels just as I planned (17 completed it, but one was really noisy due to bad seeing and I didn't like how it merged with those around it so I did an additional one that overlapped part of the area and the surrounding panels).

I now had to do this all over again twice more ... or did I? I realized that the way I was planning on processing this meant that I would be using the Hydrogen-Alpha layer for all the detail and just needed the color-data from the OIII & SII as I was going to do a tone-map of all 3 for the colors. I had seen on my UK forum an adapter that allowed me to connect my Nikon lenses to my Atik ccd. I began to think this might just work and would cut down months on the total time I needed. I ordered the adapter and figured up the field of view requirement to determine which lens I needed with my small-chip ccd. Turns out that my 105mm Nikon lens would be perfect. I still wasn't convinced that it would work so once the adapter came in I spent a night doing a proof-of-concept with the OIII filter. I got a nights worth of data and came in to process a bicolor image to see if my plan would work. Voila! It DID! So instead of doing the 18 panels an additional 2 times I just needed a few clear nights each for the OIII & SII and would get the whole frame in each sub.

More rain, and a full moon delayed another week, but I was able to get around 7 hrs for each channel and went to process it to see if I would require more. I have determined I do not - that what I got would work well although normally the OIII & SII colors would still be a bit noisy at this point, since I was doing a tone-map that really didn't matter. So, at my 2 year anniversary of starting astrophotography my narrowband mosaic of the North American and Pelican Nebulas is complete. I have mapped the color in a modified Hubble Palette.

Here are the image details:

Object: North American Nebula & Pelican Nebula
Image date: May 21, 2011-August 21, 2011
Image type: Full narrowband (SII, Ha, OIII) mosaic
Camera: Atik 314L+
Guide camera: Starlight XPress Lodestar
Scope: Orion EON 80ED
Filters: Astronomik Ha, SII, & OIII
Total Integration Time: 72 hours
Integration time/channel: Ha-58 hrs 40 min, OIII-6 hrs 20 min, SII-7 hrs
Mapping: Modified HST (SII, Ha, OIII), Luminance (Ha)


As soon as they finish uploading, the image will be available on my website under the Nebula section and a Zoomable to 1:1 version so you can see more details is located HERE. Currently only the Ha channel is located on the links. I will update this once the uploads are complete.


Thursday, August 18, 2011

Shortlisted for Royal Astronomy Photographer of the Year 2011

On a whim and just to say I threw my name in the hat I submitted 5 photos from the past year into the Royal Astronomy Photographer of the Year competition put on by the Royal Observatory at Greenwich. I have only been doing astrophotography for a little less than 3 years now so to my shock and delight I received an email a few weeks ago saying that 3 of my images had been short-listed! I am beyond excited just to have even been shortlisted and on top of that got an invite to the awards ceremony and exhibition opening on September 8th at the Royal Observatory.

I am going to have a great time at the exhibition and meet fellow astrophotographers and I am honored to have even been shortlisted. Now I get to anxiously wait until September 8th!

Here are the 2 of the 3 images I had shortlisted:


Monday, August 8, 2011

North America & a Pelican

I have been continuing work on my narrowband mosaic project. I first started imaging on this project on May 21, 2011. In the early morning hours of August 7 I finally got 1/3 of the way through by finishing the Ha portion of the mosaic. I still have a ways to go to colorize the image with SII & OIII, but I am very happy with the Ha and looking forward to the final result.

I have been continuing to update the zoomable version located at http://mosaicproject.eprisephoto.com 
Very large, high-res prints are now available on my website as well at: http://www.eprisephoto.com 

Here are the image details:

Image type: 17 panel mosaic
Camera: Atik 314L+
Guide camera: Starlight XPress Lodestar
Scope: Orion EON 80ED
Filter: Astronomik Ha 12nm
Integration time (per panel): 10 x 1200sec
Integration time (total): 56 hrs 40 min

Monitor Calibration

Monitor Calibration
The grayscale above presents 24 shades of gray from pure white to solid black. If you cannot see all 24, your monitor needs calibration to view the astrophotos correctly: I recommend the site linked in the image