I will include photos as I go so you can see how the steps progress. I started with several stacks as I took multiple exposure lengths. I took 5 different sets and ended up making 2 master stacks: one for the core with the 60s and 120s exposures, one with the 480s, 600s, and the 900s exposures for the rest. I would normally use each set as its own process and layer the 5 together but started with the two to try to save time and it turned out well so didn't go back and do the individual stack processes.
Here are the two master stacks:
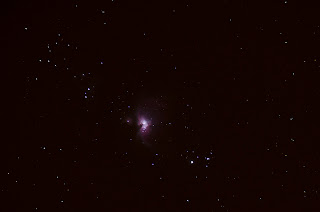 |
| Core Stack |
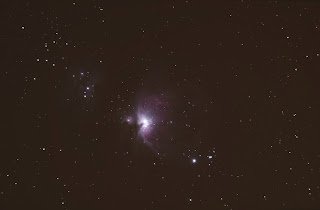 |
| Long Exposure Stack |

 I saved this and then pulled up the long exposure stack and for the first run-through on it I removed the stars (action in the set) and some additional fine tuning using the clone tool for the brighter stars resulting in a starless main stack. I also ran GradientXTerminator for the image as I had a little bit of gradient showing from shooting in the south where there is a town about 15 miles away:
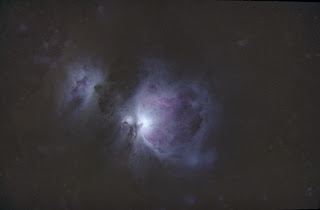 From here I ran the Channel Process action followed by a couple small manual rounds of curves, as well as the dust & scratches filter to take care of a few of the star remnants that pop up when you stretch which left me here:
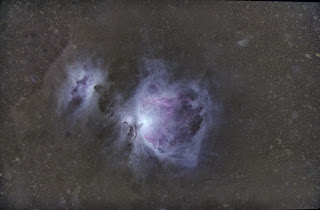 I opened up the Color Efex Pro plugin and used the Detail Extractor as well as the Color Contrast Range selections which brought out a good bit of the dust. I did a little additional touchup with Dust & Scratches and the clone tool for the star remnants again (especially for the two larger stars just at the bottom on M42):
 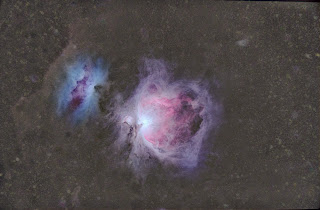 The colors were beginning to get a bit muted so I did some selective color boosting to bring out the reds that had gotten dulled down when I balanced the background with GradientXTerminator:
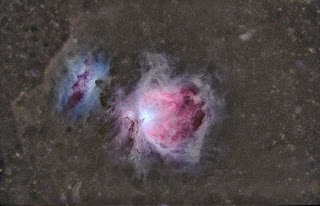 I ran my Enhance Dust lanes action and then pulled the image back into Color Efex Pro and did a mild Detail Extractor along with Tonal Contast and Pro Contrast:
 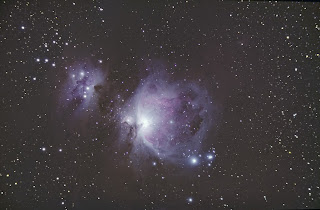 Now I opened the original stack and began processing with the Channel Process action and the GradientXTerminator plugin (basically started the processing the same way I did with the starless version):
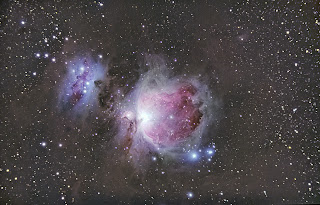 I ran Enhance Dust Lanes and some selective color boosting via Match Color (Image>Adjustments). To do this I used the lasso tool, feathered, on the two nebulas individually so I could customize each one a little better. After this I ran the Reduce Star Size action followed by Boost Star Colors. I then did a small amount of curves:
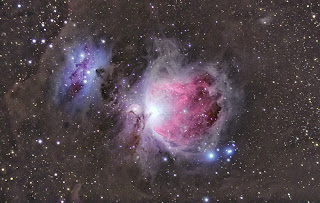 Now I brought the starless processing up and made it a layer on top of the starred semi-process and set the blending mode to lighten to bring through the stretched dust of the starless version and the stretched stars of the lower layer. I pulled up the lens correction filter and used it to counter some of the coma I had from forgetting to use my field flattener. I cropped as well just a small bit to focus the attention more on the nebula and the immediate surrounding dust:
 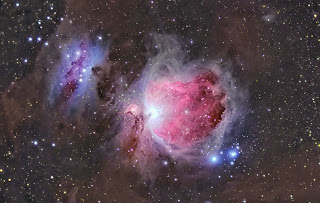 I did a little more color boosting with Match Color and the Brighten Color & Sharpen action and used some layered contrasting on the dust. This helped to make the browns in the dust pop compared to the background and the colors and details in the nebula to show up a bit better:
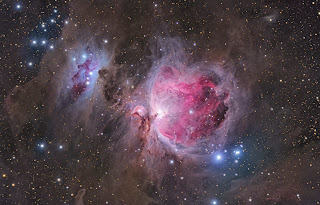 Now I opened up the core processing and layered it into the core section of M42 (using this method) to show the detail of the core in the parts that got blown out in the longer exposure stretching. I toned down the blue a little around M43 as well since the previous color boost had made it a bit more of a focus than M42. Finally I ran the star color boosting action and ran Noise Ninja on the image to produce the final image:
Here is a larger version of the final image:


Amazing work Anna the dust looks wonderful and really makes the whole picture stand out.
ReplyDeleteGreat nebula!
ReplyDeleteThanks for Wonderful article! I get more knowledge here...
Keep sharing wonderful article guys!
AstroNews
Beautiful picture Anna
ReplyDeleteYour very talented
I can only wish to get pictures like yours
Beautiful picture Anna
ReplyDeleteYour a very talented Lady
I can only wish to create images like this
Amazing work, amazing image
ReplyDeleteAmazing work, amazing image
ReplyDeleteSome Amazing work there, and some amazing amazing images
ReplyDelete